Mikrotik Cloud Core Router (CCR) Setup and Configuration first time
Mikrotik Cloud Core Router (CCR) is an Ethernet and Fiber hotspot router. There are many different CCR model available in CCR series based on physical hardware specifications. The configuration of MikroTik CCR all model are the same. In this post, Mikrotik CCR1009-7G-1C-1S+PC router used. CCR1009 is model number 7G – 7 Gigabit Ethernet, 1C- 1 Combo Port( SFP fiber port). It is the best router for an internet service provider using fiber and copper wired network with redundancy power supply. The CCR router can be used for managing network and bandwidth management gateway.
It is managed router support full feature of MikroTik firmware to managing large networks. Gigabit Ethernet port can be used for multiple internet providers as load balancing. Mikrotik CCR router having micro USB and smart card slot for SIM and one micro SD slot for memory card. To configuration MikroTik cloud core router required a physical wired connection from PC/Laptop to access Winbox configuration utility. Read MikroTik hotspot configuration also after setup your CCR router.
Mikrotik Cloud Core Router Configuration Steps
- WAN Configuration
- LAN IP Configuration
- DHCP Configuration
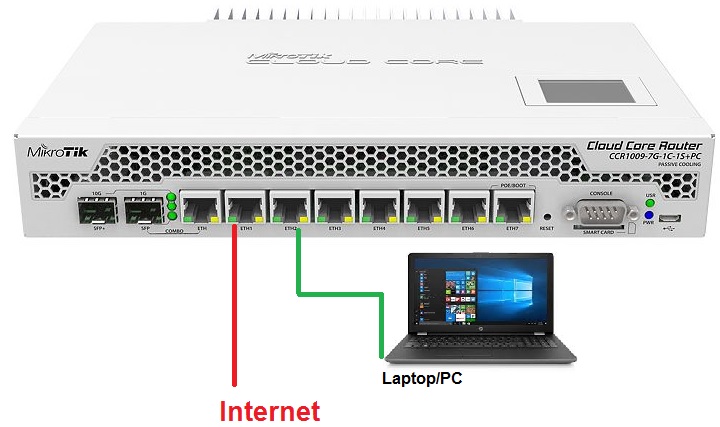
Mikrotik Cloud Core Router Connection Diagram
Connect the physically your CCR device with your PC/Laptop to configure for the internet.
- Power on the device with a backside power port using a power cord comes with the device.
- Take LAN cable and connect Eth2 from Laptop LAN Port.
- Connect internet cable coming from providers to ETH1 port.
Mikrotik Cloud Core Router Default Settings
Mikrotik CCR router can be accessed using Winbox utility or through a web browser. If you have no idea about login username and password configured before then reset mikrotik ccr router first to restore factory settings.
Download the Mikrotik Winbox.
Mikrotik Default IP is 192.168.88.1, username – admin, password -NA
PC LAN IP address- use the 192.168.188.2 or use DHCP in LAN settings to configure CCR.
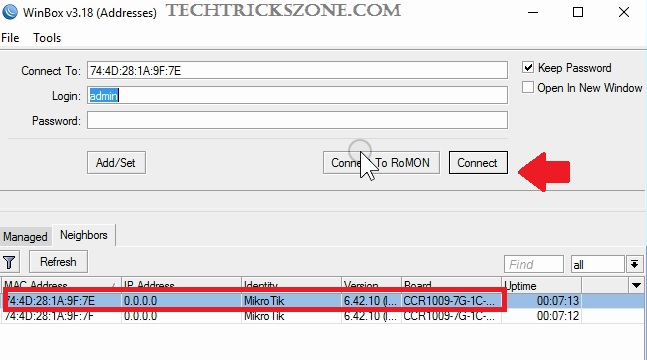
Login CCR from Winbox
Open Winbox and go to the Neighbors tab.
Select the CCR mac and click the Connect button.
MikroTik CCR WAN Configuration for Static IP
Get the Static IP from your internet provider with DNS and gateway details.
1: Go to IP-Address
2: Press the Plus(+) button to add a WAN IP Address.
3: Address- type the WAN IP address.
4: Interface- Choose the interface ether1 for us as WAN Port (you can use another Port if you want to change)

Press Apply and OK button to save settings.
Mikrotik CCR Gateway and DNS Configuration
Gateway and DNS also part of WAN configuration so it must be configured to work internet.
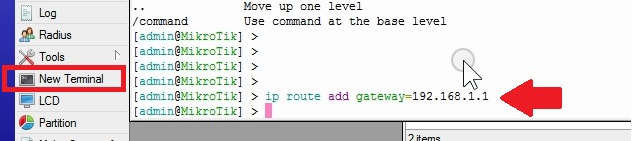
To add Gateway got to New Terminal from the left side menu.
Use the command to add the gateway.
[admin@MikroTik] > ip route add gateway=192.168.1.1 press enter key
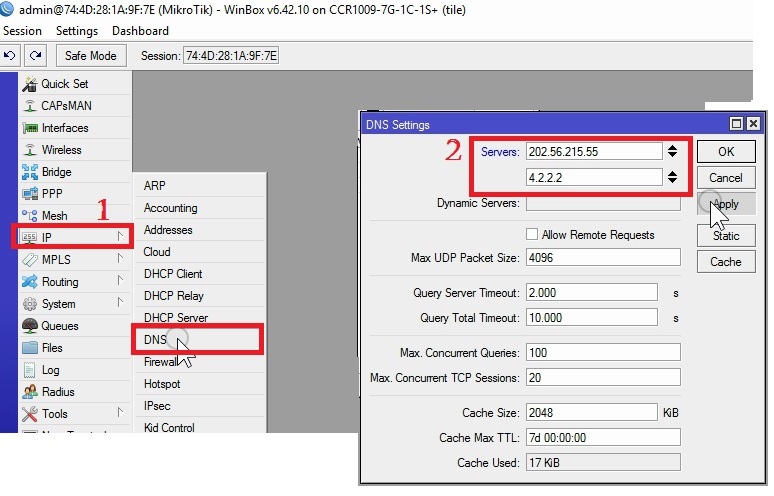
Add DNS in Mikrotik CCR
1: Go to IP-DNS
2: Server: add DNS server here
Press Apply and OK button to save settings.
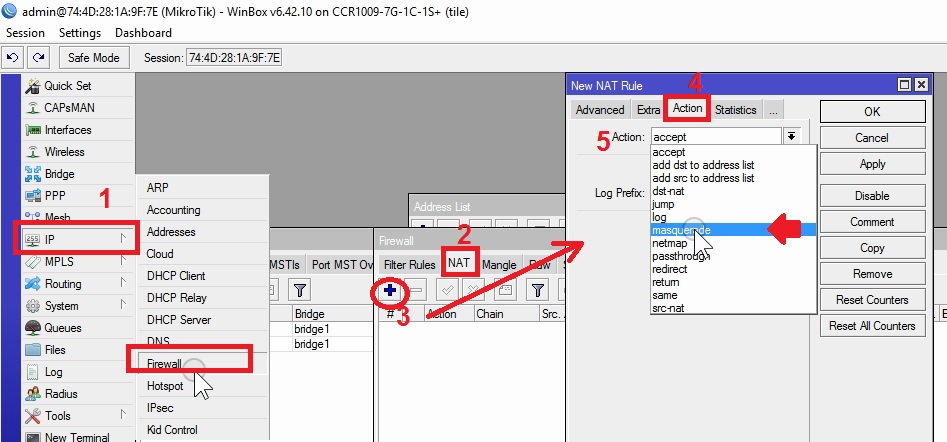
Mikrotik Cloud Core Router (CCR) NAT Configuration
Enable the NAT in CCR.
1: IP- Firewall
2: Go to the NAT tab
3: Press Plus (+) button.
4: Go to the Action tab.
5: Action- Choose the masquerade and press Apply OK button.
WAN Configuration was done. You can ping internet IP or DNS from the terminal to confirm settings
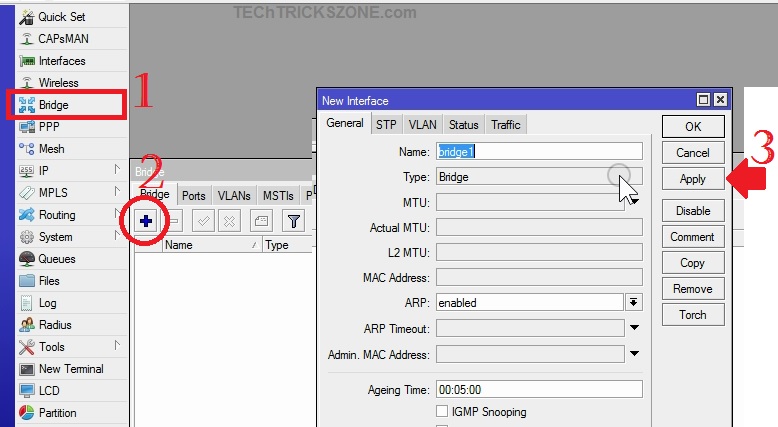
Bridge All LAN port in MikroTik CCR
To use all LAN port as switch need to make bridge all the LAN ports.
1: Go to Bridge
2: Bridge- Press Plus button (+).
Name- give the name to bridge if you want to change.
3: press the save button.
Add Interface to bridge each other
1: Go to Port tab and press plus button (+).
2: Interface: Choose the interface number from the list.
3: Press Apply and OK button to save
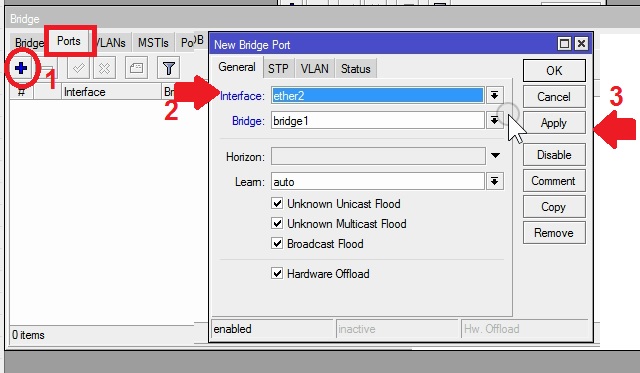
To Bridge, all Ethernet port use all options or to bridge the selected port to create one by one as the above steps.
Mikrotik CCR LAN and DHCP Configuration
The MikroTik router comes with the default IP address so highly recommended to change the default IP.
Add LAN IP address follow the steps.
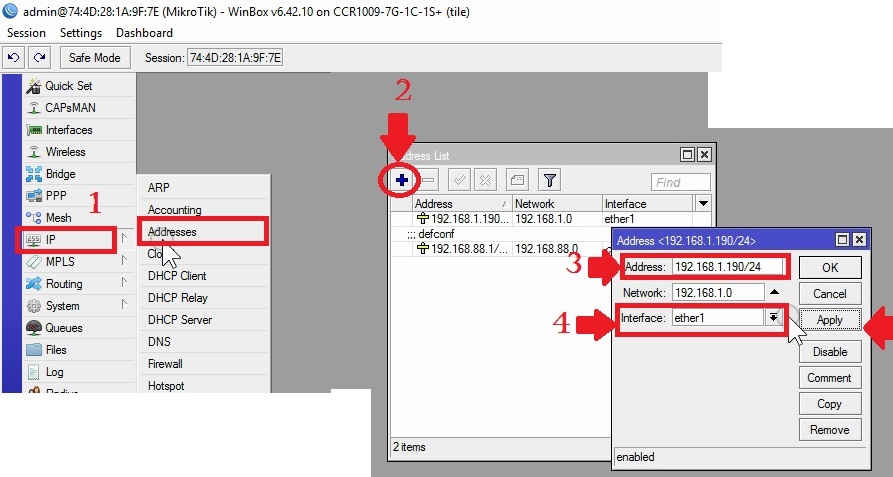
1: IP-Address
2: Press Plus (+) button to add the new IP address.
3: Address – use the IP address in this box for LAN.
Interface: select the bridge interface to use for all port same DHCP. You can use a specific interface if want to use multiple WAN Port and DHCP server for different ports.
Press the Apply and OK button.
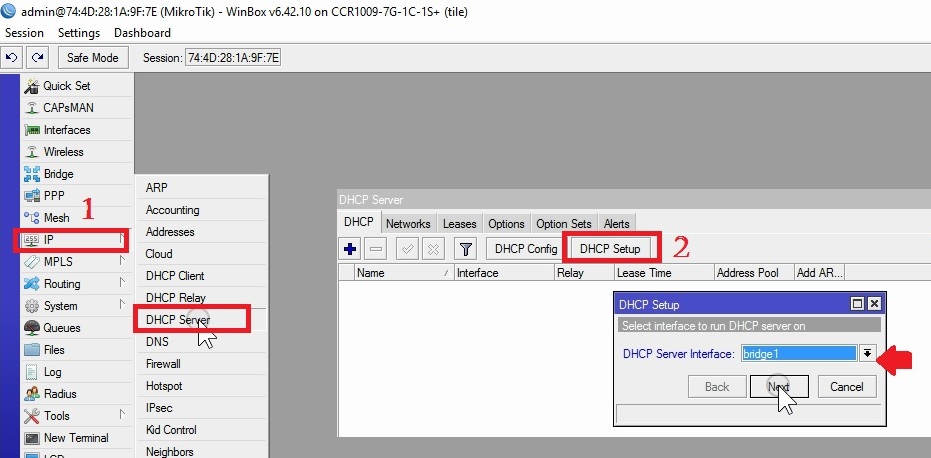
The DHCP Server Setup in Mikrotik CCR
To Setup DHCP server in Mikrotik cloud router required to below steps.
1: IP-DHCP Server
2: DHCP Setup
DHCP Server interface- select the interface you want to use DHCP range.
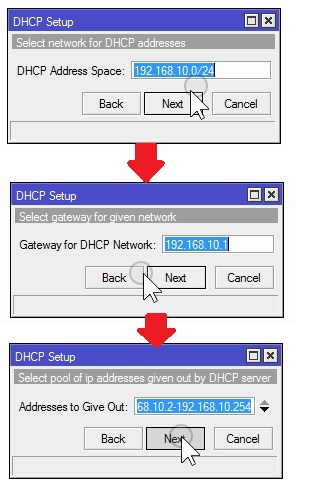
DHCP Address Space- this will show the interface IP address. Click Next button
Gateway for DHCP Network– Give the specific gateway or keep it default if you don’t want to give specific.
Press the Next button.
Addresses to Give Out- give the IP address range you want to use in a network for hosts. Press the next button.
Select DNS Server- This will use DNS server configured in WAN. You can use specific DNS also.
Press the next button for the next steps.
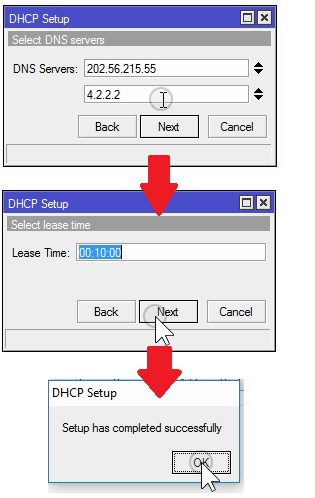
Lease Time- give lease time and click Next button
Setup has completed successfully message will be done the DHCP configurations.
Now Mikrotik CCR basic internet setup done. Go to your Laptop/Desktop LAN port and change into DHCP mode. Check the internet it should work.
Related Post
- MikroTik 10 Best Device for Internet Service Providers
- How to block Website in Mikrotik Router OS from Winbox [URL & Keywords]
- How To Customize MikroTik Hotspot login page with your own Design
- How to design OTP Based Authentication Hotspot Solution for Coffee Shop
