Looking to connect your office with a wireless point to point connectivity. You can go with UBNT device and this post will guide you how to do UBNT Rocket M5 Configuration to connect two different locations with wireless Link.
How to setup UBNT Rocket M5 Configuration for Base Station as Access Point Mode
Ubiquiti Network is a Wireless Networking Product Manufacturer Company of San Jose located in California’s. Ubiquiti network also has known the short name of UBNT. It’s providing low cost and high range wireless product for small and enterprise-level wireless networking solution. Wireless product useful for the local internet service provider to provide last mile connectivity solution. UBNT Rocket M5 Configuration Best and Easy Tutorials for beginners. Also, check out the ubnt unifi controller setup to monitoring all ubnt device in a single location.
If you are looking for a low-cost wireless solution than UBNT product will be the best budget product for your network. UBNT provide low cost with best performance product use for small and large industries also. You can also use low-cost network device such as network switch, IP camera, Wireless Antenna for your Network. UBNT provide an easy user web interface to make easy configuration for everyone who is a networking engineer or a non-technical person also. Integrate CCTV camera with the wireless device using Rocket M2 and Rocket M5 device.
UBNT Rocket M5 and Rocket M5 Compliance Test Mode
If you never try UBNT product yet you can use and compare with other products with the same price range after that you can be the confident product. Please read all document-related information from the official UBNT website for compliance with legal regulatory of your country. This website only provides the free user guide for configuration. Techtrickszone.com not claim or grantee about the product match legal regulatory or not, so make sure you before buy and use you have read all documentation carefully.
Difference between Ubiquiti Rocket M2 & Rocket M5

Do not Confuse with UBNT Rocket m2 and UBNt Rocket m5 Device difference if you start using UBNT product first time. The difference is only Frequency band because Rocket M2 means it supports 2.4 GHz Frequency and Rocket M5 is 5Ghz Frequency Channel device. 2.4 Frequency Used for Indoor Wi-Fi and mobile, Laptop support only 1-11 channel (2412~2462) 5Ghz band use for outdoor long-range point to point (back-haul) and point to multipoint connectivity. UBNT Rocket M5 Configuration Read More.
The configuration of Rocket M2 and M5 both are the same because the web user interface is the same. So if you know the configuration of Rocket M2 than you can also configure Rocket M5. Only you should know the difference of both device frequency band so you can use the device accordingly.
Rocket M2/M5 Access Point Mode Configuration
Before start configuration makes sure your Laptop or PC LAN IP Address should be in the same series of UBNT Default IP Address.
Exp: UBNT Device default IP Address is 192.168.1.20 so you Laptop or PC IP should me 192.168.1.2 to 254. Only you cannot use 192.168.1.20 IP in your Laptop LAN because you would now able to access Device If you use the same IP in Laptop.
- Ubiquiti (UBNT) Default IP- Address is 192.168.1.20
Put Same Series IP-Address in Pc/Laptop (Ex: 192.168.1.x)
Open Internet Browser and type http://192.168.1.l in address Bar.
Default Username: ubnt ( Caps Lock is off )
Password: ubnt ( Caps Lock is off )

UBNT Rocket M5 and Rocket M2 Wireless Configuration
- Go to Wireless Tab
- Wireless Mode: Access Point
- Frequency MHz: Set Channel as per area interference
- Wireless Security: Set Wireless Security for Network Protection

Wireless Mode should Access Point or Access Point WDS for the first device or if you want to use it for Base station.
SSID: use Network name here whatever you want to use, This name will show when you scan from remote side device
Country Code: Choose as per your country name to compile with legal channel regulations.
IEEE 802.11 Mode: if you are configuring rocket M2 use BGN and if you are configuring Rocket M5 choose A/N.
Channel Width: Choose the channel width as per your bandwidth requirement and interference label in is you want to use this device.
Frequency, MHz: for Rocket M2 use channel no. from 2412 to 2462 and for Rocket M5 choose frequency as per your location interference.
Output Power: adjust output power if you are using the radio in a short distance. Transmitting full power in short distances can be damage radio wireless quickly due to high signal receiving.
Click Change and then Apply.
How to Change UBNT Rocket M2 LAN IP Address
For Point to point and Access Point mode Network mode should be Bridge. If you want to use your Access Point as a router also you can choose Network Mode Router but after change Network mode to the router, you can only access device with Wireless because Lan port will turn into WAN port.

- Network Mode: Bridge
- Network IP Address: Static / DHCP
- IP Address: set IP Address here
Network IP Address: Change IP address here if you want to use any different series.
Management VLAN: if your network using VLAN than you Enable Management VLAN in UBNT device with the Management VLAN option in the Network tab.
How to disable UBNT AirMAX Settings
airMAX Setting is the Ubiquiti network proprietary feature. If you enable this feature then it’s not allow you to use a third party client device associated with the UBNT device. so if you want to use third-party client device then make sure airMAX setting is disabled from the main tab.

AirMax Option Enable will not allow you to connect any third party device with UBNT device. If you want to connect any other brand client device with UBNT Access Point than make sure airMax feature disabled.
UBNT Rocket M2/M5 Link connection Status
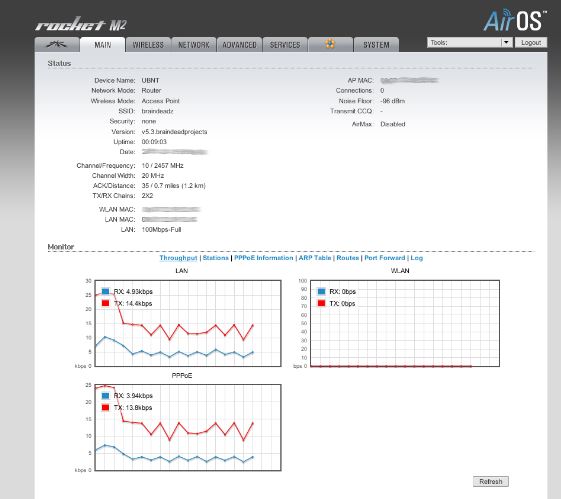
Status page shows all information about device settings, mode, Mac ID, CCQ and connectivity status with the signal.
In the status page, you can also use some tools to check the connectivity of remote site devices with using ping utility from inside radio only.
About Graph :
LAN: LAN graph will show total TX and RX data packet running on LAN port.
WLAN: WLAN graph will show total RX and TX data packet going on WLAN one Radio to other radio. This will also call throughput of Point to Point radio link maximum data radio can carry with WLAN.
PPPoE: If you are running PPPoE in the device than this graph will show traffic of PPPoE dial-up connection receiving and transmitting.
This Configuration guide also supported for UBNT other model is given below.
- airGrid M
- airGrid M5
- NanoBeam M
- Lite Beam M
- PoWer Beam
- Bullet M2 and bullet M5
- Nano station M2
Related Post
- 192.168.1.1 Login Technicolor Router
- How to Check Tower Height for Long distance Point to Point in Google Earth
- How to design OTP Based Authentication Hotspot Solution for Coffee Shop
- Best Dual Band WiFi router under 2000 Rs for 100+ Mbps Internet Plan
