TP Link TL-R480T+ Load Balance Router Configuration for Fail-over
TP-Link TL-R480T Load balance router configuration used the multi internet connection to avoid downtime due to internet disconnection. Before learning how to configure TP-Link load balancer router see about hardware specification required for fail-over and load balancing management. Load balance and fail-over feature only work with 2 or more WAN port in the router. With WAN port 2 internet line can be use failover and load balancing but if you looking for load balancing more than 2 internet connection than your required more than 2 WAN port in your load balance router. See the TP-Link TL-R480T Plus hardware specification to understand how many internet connections can be used as fail-over and load blanching with TP-Link network load balancer router. Also read enable captive portal login page on TP-Link load balance router.
- How to block a Website and Apps on basic WiFi Router
- How to Connect Any Wi-Fi without Password from Mobile
TPLink Load Balance Router Hardware Specification.
TP Link balance router which can be used for more than 2 internet connection bandwidth speed balance and TPlink dual wan fail-over setup.
Load Balance Broadband RouterTL-R480T+
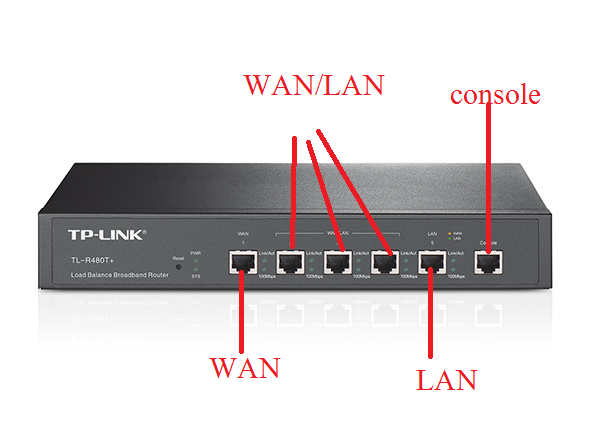
TL-R480T Plus Load balance router has a hardware port.
| Interface | 1 Fixed Ethernet WAN Port 1 Fixed Ethernet LAN Port 3 Changeable Ethernet WAN/LAN Ports |
| Network Media | 10BASE-T: UTP category 3, 4, 5 cable (Max 100m) 100BASE-TX: UTP category 5, 5e cable (Max 100m) |
| Button | Reset Button |
| Power Supply | Internal Universal Power Supply AC100-240V~50/60Hz input |
| Flash | 8MB |
| DRAM | 64MB |
| LED | PWR, SYS, WAN, LAN, WAN/LAN |
| Dimensions ( W x D x H ) | 11.6*7.1*1.7in. (294*180*44mm) 13-inch Standard Rack-Mount Width, 1U Height |
1 Fixed Ethernet WAN Port
1 Fixed Ethernet LAN Port
3 Changeable Ethernet WAN/LAN Ports – WAN/LAN port means you can use that port as a WAN or a LAN as per your requirements.
1 Console port available for configuration of the router.
TP Link TL-R480T+ Load Balance Router Login first time
To login, TP-Link router connect LAN port to your Laptop/Computer LAN port and use static IP address same series of TP-Link broadband router default IP address.
TP-Link TL-R480T Plus default IP Address – 192.168.0.1
Default username / Password – admin/NA (need to set on the first login)
Exp- use 192.168.0.2 in your Laptop/PC LAN port to make the access TP-Link Load balancer router web page.
Open the Web browser and type 192.168.0.1 and hit the enter key
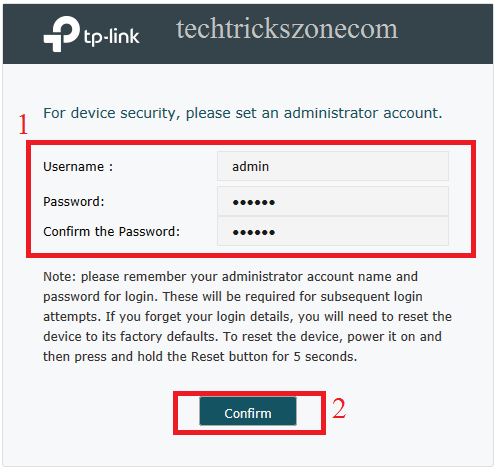
Now use the default username and set the new password to login router.
1:- username – admin
Password- type new password
Confirm password- confirm the new password to avoid mistake on the password.
2:- Press confirm button to save the setting.
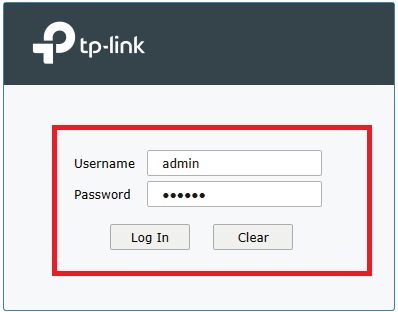
Now login TP-Link Load balance router with username and password you set in last steps. Click login to enter in router settings.
TP Link TL-R480T+ Load Balance Router WAN Configuration for Failover
TP-Link TL-r480 broadband router more than 1 WAN configuration required to use load balance and failover feature. To using load balancing configure at least 2 WAN port to make fail over the router. Keep ready both internet connections IP address or PPPoE username and password to start wan configuration.
To start WAN configuration first need to set the total number of WAN port we want to configure
Configuring the Number of WAN Ports
Go to Network- WAN-WAN Mode
Choose the number you want to configure for WAN. Suppose you have 2 internet connections than choose 2 number to use WAN port. After selecting WAN port you will get the option to configure WAN setting for 2 ports as WAN.
TP-Link TL-R480T Configuring the WAN Connection
To configuration wan
Connect both internet connection to WAN1 and WAN2 port.
Network-WAN
Choose the WAN number you want to configure. Choose your internet type such as, dynamic, Static, PPPoE, L2TP to configure wan properly.
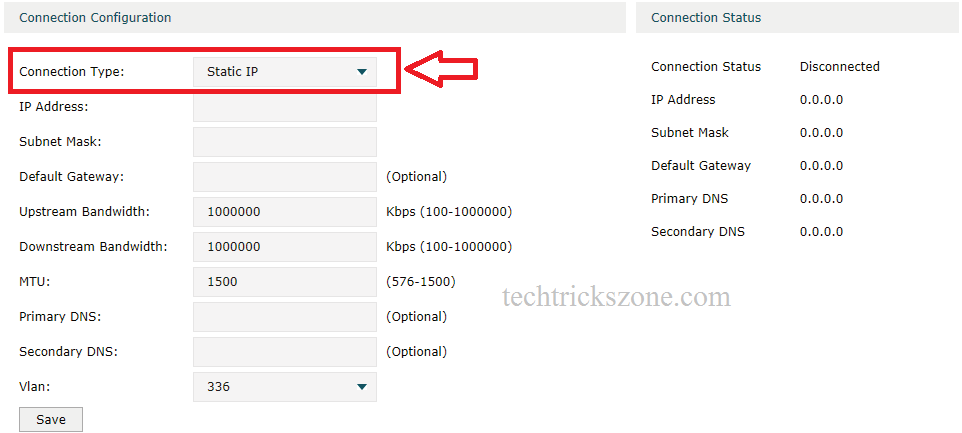
Here I am using Static IP address for first WAN configuration.
Connection type- Static IP (choose your internet type from the list)
IP Address– user IP Address given from your ISP (internet service provider)
Subnet Mask- same given by ISP
Default gateway– same given by ISP
Upstream Bandwidth – choose the WAN internet connection Upload speed
Downstream Bandwidth – choose the WAN internet connection download speed
Primary DNS – use is given by ISP
Secondary DNS – you can use global DNS – 4.2.2.2, 8.8.8.8
VLAN– If want to use VLAN you can configure VLAN otherwise leave this option as it is.
Click save to apply settings.
Trending Post: 8 best Wi-Fi router for home and office under 1000 Rs only
TP-Link TL-R480T Plus Configuration WAN 2 for Load Balance
To configure the second WAN choose the Network-WAN and WAN number you want to be configured.
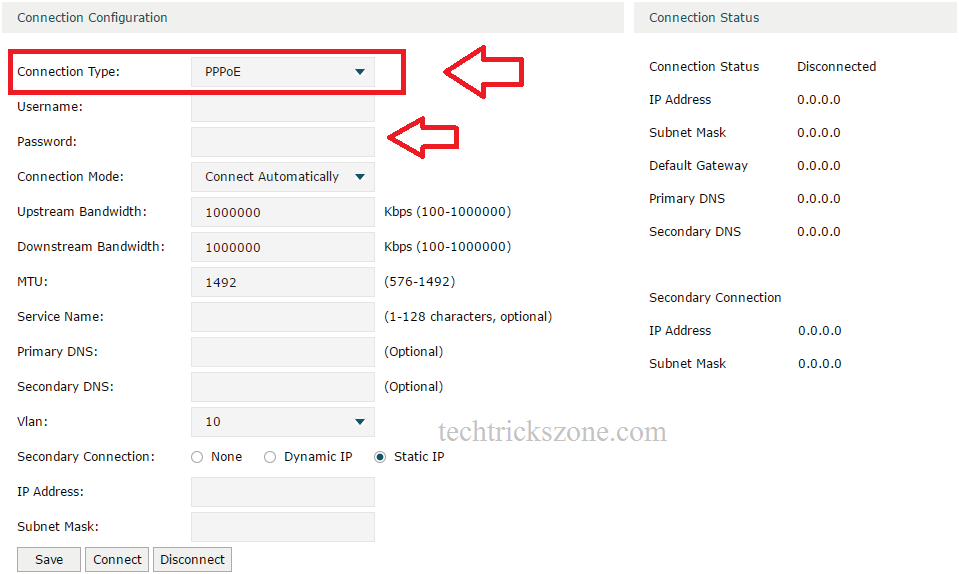
I am using second WAN type PPPoE connection type.
Connection Type- PPPoE
Username – ask your isp if you do not have details
Password- same contact ISP
Connection Mode- Connect automatically
Service name- use this if provided by your isp
Do another setting like the above steps.
Click save to apply the setting.
TP-Link TL-R480T Plus LAN and DHCP Server Configuration
After WAN configuration required to configure LAN and DHCP server. As the default IP using in the same network can be conflict IP Address so recommended always change the default IP address before connecting to live network.
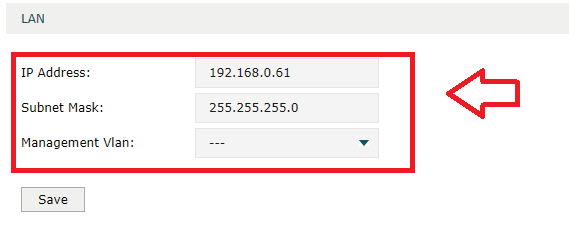
Go to Network- LAN
Here you will get Default IP detail where you can change IP address according to the network.
IP Address– change LAN IP here
Subnet Mask – change subnet mask as per IP series.
Management VLAN– use management VLAN if you using VLAN in the network.
Click the Save button to apply settings.
TP-Link TL-R480T Load balance router configuration DHCP Server
To using a large network DHCP server must be enabled to auto IP configuration on users PC and mobile.
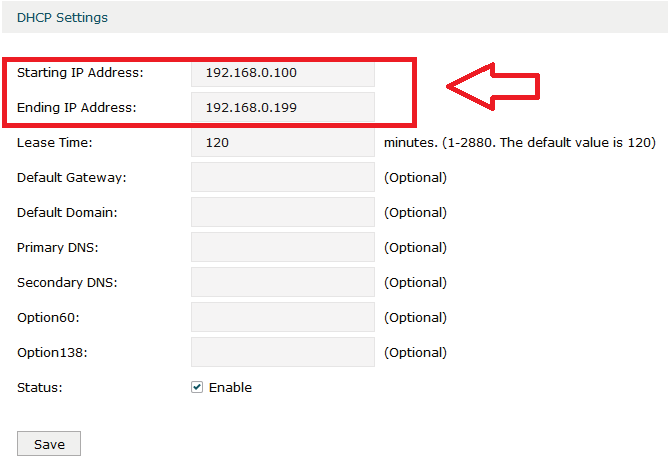
To enable DHCP server Network > LAN > DHCP Server
Starting IP Address:- use the IP start to use in the network
Ending IP Address – use last IP address use in the network.
Lease time – increase lease time
Status– enable (this option should be checked)
Click the Save button to apply changes.
How to use Youtube on Nokia CS3
TP-Link TL-R480T + Load Balancing Configurations
After WAN and LAN configuration you can start load balancing configuration. Load Balancing there are three-part which can be used.
-
Configure the load balancing
-
Setup the link back up
-
Configure the online detection
Load Balancing Configuration
To load balance configuration
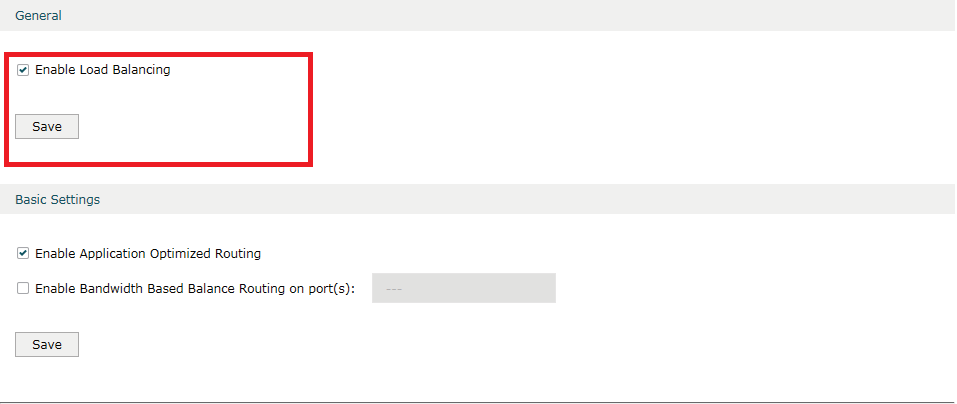
Transmission> Load Balancing > Basic Settings
Enable Load Balancing – Check this option to enable the load balance feature in TP-Link TL-R480T
See Also: How to Integrate CCTV Camera With Fiber Optic Network
TP-Link Load Balance Router Configuring the Link Backup
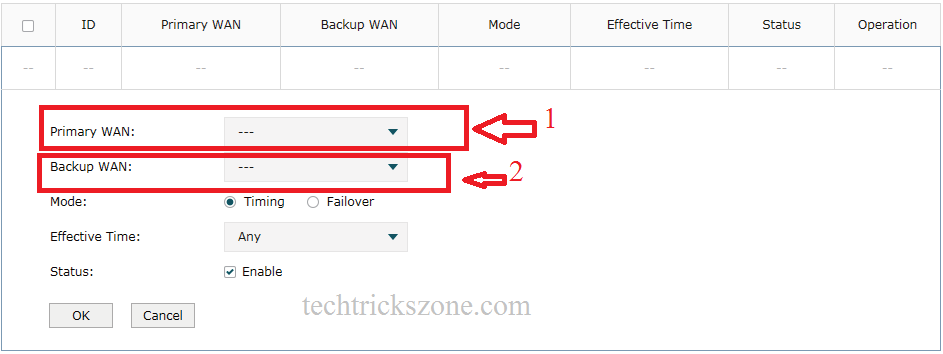
Now configure Link backup option to use failover when the main internet connection goes down.
Primary WAN– select the WAN port you want to use for the main internet connection.
Backup WAN – select a second internet connection to use as the backup when the primary internet connection goes down.
Mode – Timing – means you can select any time when you want to use backup internet connection.
Failover – if you want to use the second internet line as a failover than use mode failover. When the primary line will down backup wan will activate.
Status – Enable (keep this box checked to enable)
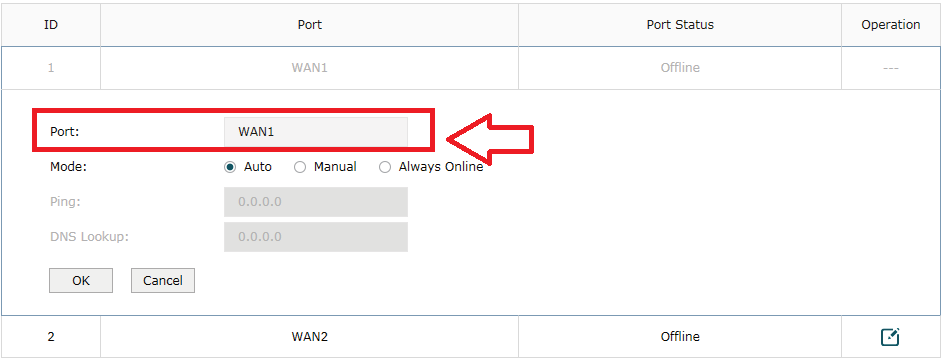
Configuring the Online Detection TL-R480T
You can set an online detection feature on TP-Link TL-R480t load balancer router to monitor port is online or offline.
To enable go to Transmission> Load Balancing > Online Detection
Port – choose the port you want to enable online detection
Mode – Auto- auto-detection, Manual- if you want to check the manual, Always Online – if you want to keep always port online mode.
Click OK button to apply settings.
This is the basic configuration for Load balance and failover in the TP-Link load balance router. For any query, you can comments or mail directly from the contacting us button.
Download TP-Link TL-R480T Load balance router Latest firmware and configuration Manual in PDF
Related Post
- TP-Link Deco M5 Mesh WiFi System Setup and Configuration (with Picture)
- 10 Best Proxy Site List to Access Block Website like YouTube and Facebook.
- How to Recover Deleted Photos and Videos from Memory Card
- How to use Airtel 4G hotspot Router as a Range Extender (WiFi Repeater)


