Tenda 06 5GHz 11AC 433Mbps Outdoor 10Km Point to Point Configuration
Tenda a quick popular brand name for networking and wireless product for the home to the commercial range. I always posted popular Tenda router configuration and setup, like Tenda N301, Tenda VDSL modem, and many more. In this post, I will cover a complete and easy configuration guide for Tenda O6 5Ghz CPE point to point configuration. Before start configuration, I will be given a brief product description of the Tenda O6 11Ac 433 Mbps Cpe device. Get user manual for Tenda point to point and point to multipoint also.
Tenda 06 5GHz 11AC 433Mbps Outdoor CPE Specification
Tenda O6 5Ghz is a 433Mbps Outdoor CPE for wireless point to point and point to multipoint connectivity. O6 5GHz CPE best for CCTV camera and internet and DATA connectivity between two locations.
Tenda O6 having 16 dBi directional antenna to long-range connectivity up to 10 km as per Tenda’s official datasheet. 1Gigabit WAN/LAN Poe port give you up to 433 Mbps wireless speed. Tenda O6 5Ghz CPE supports multi-mode, Access Point mode, Repeater mode, WISP mode, Client mode and WDS Bridge mode to use as per requirement.
Where can you use Tenda O6 5GHz CPE?
Tenda O6 supports 5 GHz band so it can use multi-service type work. If you are looking for wireless connectivity for your CCTV project to convert your IP camera into a wireless camera then this device can be used. If you are an ISP and looking for 5 GHz CPE to provide an internet connection to the end client then Tenda O6 can be used.
Wireless point to point and point to multipoint important connectivity type for long distance where physical cable laying not possible. Tenda 5GHz CPE best fit for your point to point and point to multipoint connectivity for the smart city as well as rural broadband projects.
How to setup Tenda O6 5 GHz CPE Point to Point?
To configuration of Tenda O6, 5 GHz CPE required some pre-requirement configuration for desktop and Laptop to get access the device in the web browser. First, configure your Desktop and Laptop with the Same series IP Address of Tenda Default IP.
For point-to-point configuration required 2 devices one for the Local side and the second for the remote side. So keep ready your both devices.
-
Tenda O6 and O3 AP mode Configuration for Local Side
-
Tenda O6 Client mode configuration for Remote side.
Read More:
- Tenda N301 WiFi Router Repeater Mode Configuration
- How to check who is using your Wi-Fi from Mobile (3 Way)
- How to block a Website and Apps on basic WiFi Router
Tenda O6 5.8 GHz 11 AC 433 Mbps Outdoor Long Range Default settings
To configure any device default settings required to access it in the web browser and command line. If you are going to setup the first time Tenda O6 5 GHz for PTP and PTM. You can get the default setting back side sticker of your Tenda device.
If you can’t find Tenda default login settings Please see here
Tenda O6 5.8 GHz CPE default IP Address is – 192.168.2.1
Default username – admin
Default password – admin.
PC/ Desktop LAN IP Configuration
Go to your Laptop/Desktop Control panel
Find network and sharing setting
Left side Change Adapter setting
See the Ethernet and double-click to go properties.
Go to TCP/IP4 and use Static IP address with 192.168.2.2 or 3,4, 5 anyone.
Click ok and close to confirming settings.
See LAN IP configuration step to step here
Tenda O6 and O3 5Ghz CPE Login First time
This configuration guide supports both model Tenda O6 and Tenda O3 5 GHz CPE. The difference is only Tenda O6 support up to the 10Km distance and Tenda O3 supports up to 5KM distance as per claim by Tenda’s official website.
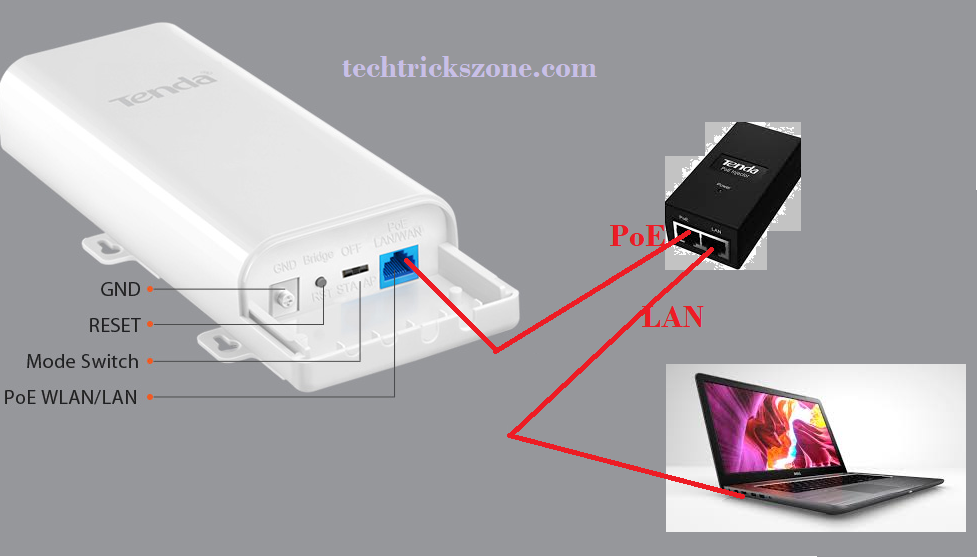
Tenda O6 and O3 5GHz CPE Network Connection Diagram
To login to Tenda CPE you must connect a proper physical connection to get access to the Tenda web interface. See the connection diagram below.
Connect Adapter PoE port to Tenda LAN port and PoE LAN port to Laptop/Desktop Lan port as follow below image.
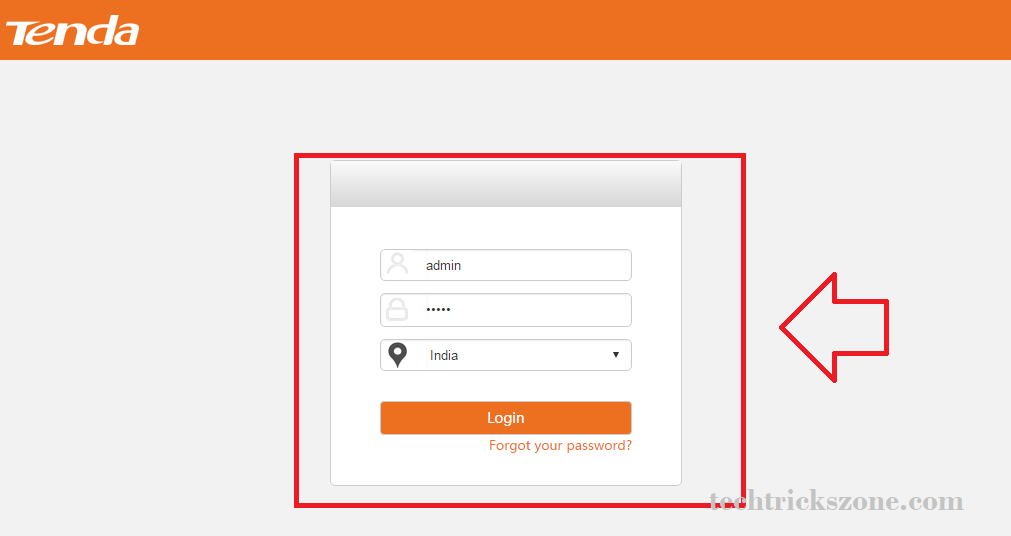
Now Open the Web browsers such as internet explorer, Firefox Mozilla, Google Chrome, and type 192.168.2.1 to URL bar and hit enter.

Login with admin/ admin default username and password.
Tenda O6 and Tenda O3 5 GHZ AP Mode Configuration for Site A
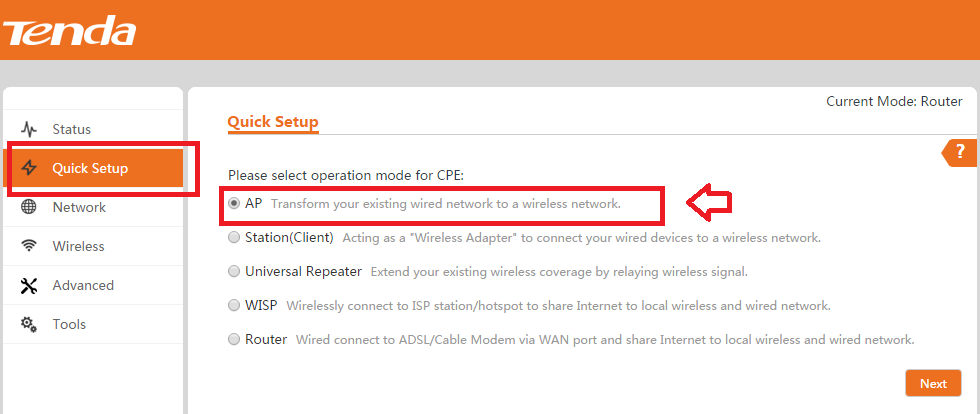
As describe already there is two site required for point to point configuration so first, we will configure Access Point mode for site A.
Tenda O6 and Tenda O3 5 GHz CPE Mode Settings
For point to point configuration first setting have to do is wireless mode settings. Configure the first device as AP mode and the second as a Client mode.
Go to Quick Setup – choose AP mode and click Next.
1 – Tenda O6 5GHZ CPE Wireless configuration
SSID– set SSID for your AP device (use any name which can be easily recognized from client end device.)
Channel- choose the best channel as per area interference
Security mode- use WPA2-PSK for stronger security as recommended
WI-FI password- type password in this box and click next for next steps.
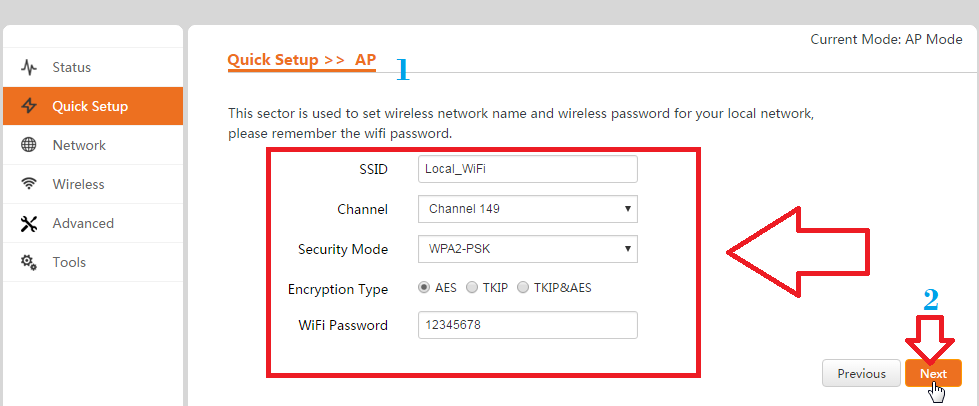
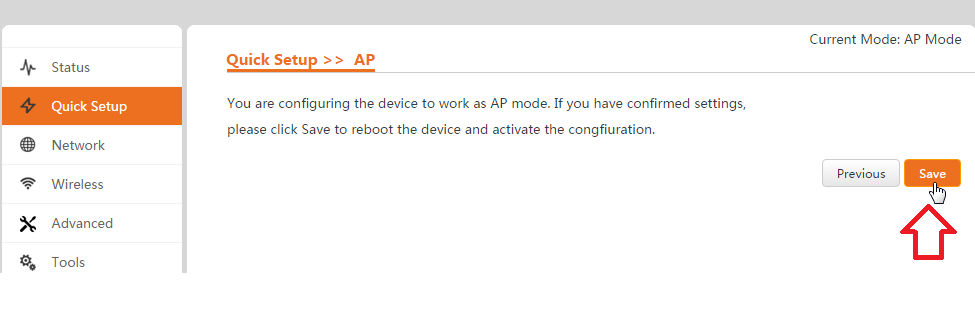
To confirm the AP mode setting click save buttons.
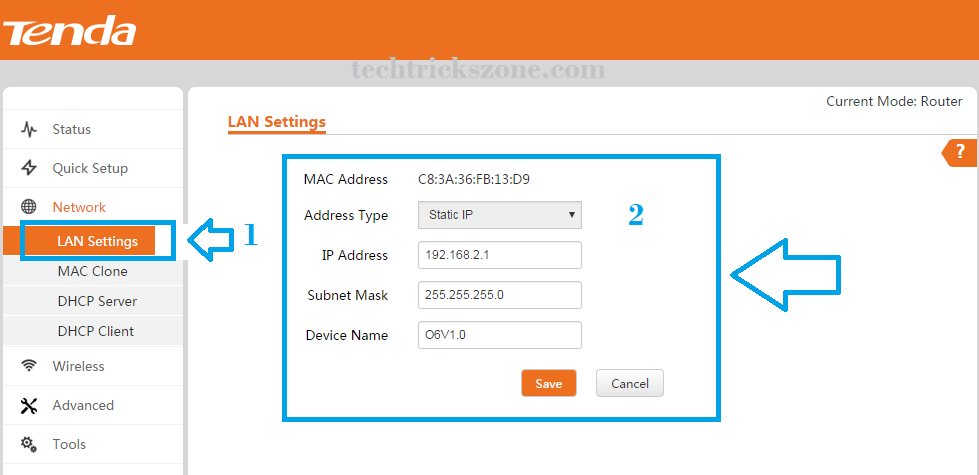
Note—as already told your for point to point and multipoint more than one device use so don’t forget to change both side LAN IP address to avoid network conflict.
You can use the next IP of same series for second-side device.
EXP- Site A side 192.168.2.1 than remote side can be 192.168.2.2.
Tenda O6 / Tenda O3 LAN IP Configuration.
1:- To change IP address go to network and LAN Settings
2:- Address Type – User Static
IP Address- use the IP address for AP side (change also client-side )
Subnet mask- as per IP series.
Device Name- you can change the device name as a location name to quickly identify your device when you access it from the remote side.
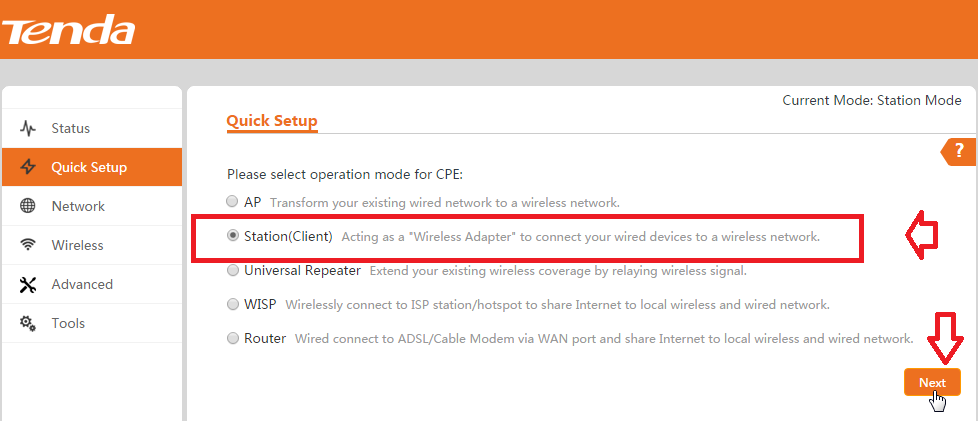
Tenda O6/ Tenda O3 5Ghz Client Mode Configuration for Remote Site.
After AP mode configuration now needs to configure client mode for remote side device.to configuration of client end device follow the above steps for connection diagram and login details.
After Login please follow the steps Tenda O6 LAN IP configuration first to change client device IP address.
login with new changed IP address and change mode to client mode first.
Quick Setup – Station mode chooses and click next steps.
In next step, you get the Scan button to find your AP device name as configure by you.
Select your Tenda AP mode SSID name from the list and click next for password configuration
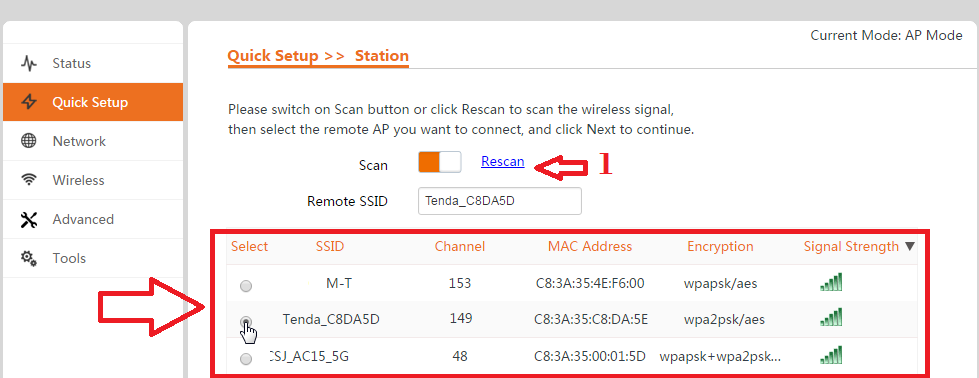
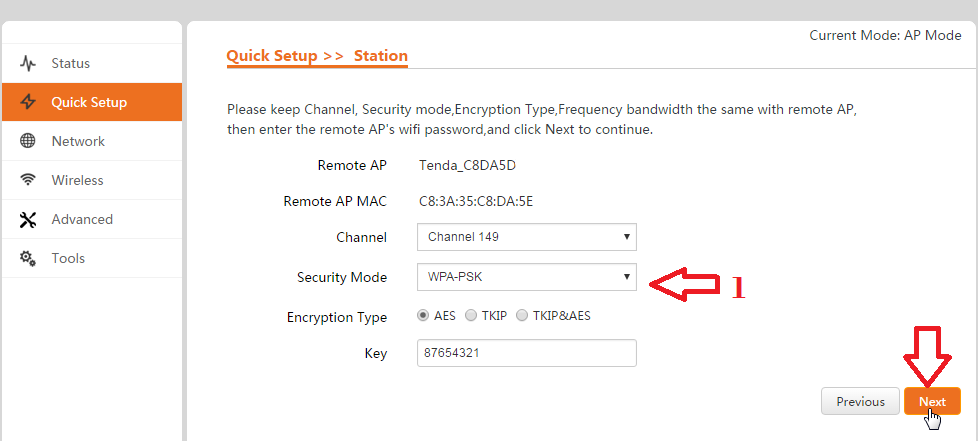
Channel and Security type will auto-detected from AP settings. Please do not change Channel.
Type password in Key box to confirm the connection with AP mode device.
Click Next button to save settings.
After rebooting and save the setting you can check the Status page to connected status and signal strength for the same device.
Tenda O6/ Tenda O3 5Ghz Point to Multi point Configuration.
To configure Tenda point to multipoint mode AP device configuration will be the same. To multipoint connectivity repeat the client mode configuration for multi-device you want to configure with AP device.
Example – if you have 3 different locations and you want to connect point to multipoint then follow the steps.
- Configure Tenda O6 in AP mode Location A
- Configure Tenda o6 or o3 as client mode for location B
- Again configure the Tenda O6 or O3 CPE with client mode for location C and more.
How to Factory reset Tenda 06 5GHz 11AC 433Mbps Outdoor CPE.
There are some important maintenance and administrator settings required in every wireless router and device. See if you forgot IP username or password for Tenda Wireless router than how you can reset it.
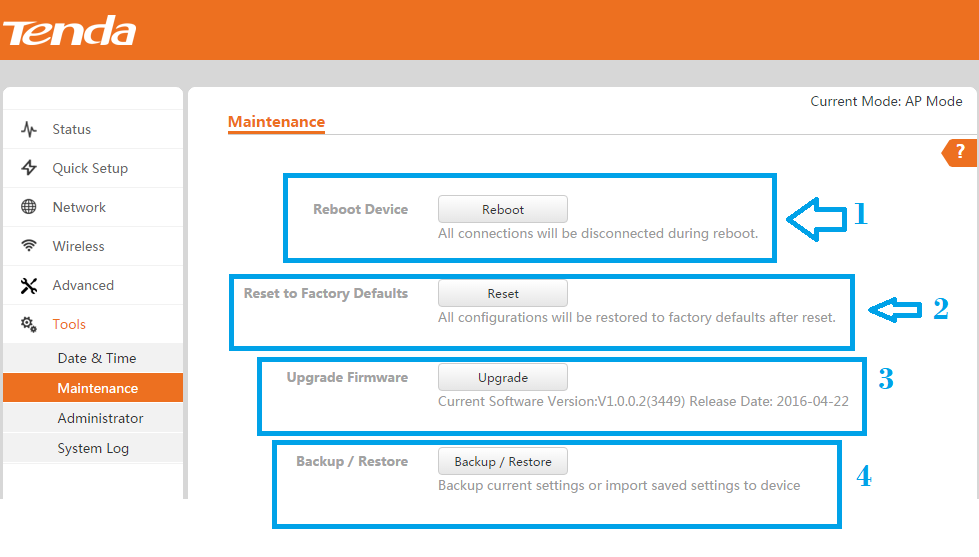
Go to Tools – Maintenance option
- Reboot – this button will use for Tenda O6 reboot
- Reset to factory reset– If you want to factory reset the device use this option.
- Upgrade firmware – Tenda o6 and tenda o3 upgrade the latest firmware with this option.
- Backup and restore– After configuration of the Tenda router, you can save the configuration file for future configuration in case you required Tenda device factory reset.
Download Firmware and Dhatasheet for Tenda O6 5GHZ CPE
This is basic steps to configure pint to point and point to multi-point for Tenda 5GHz CPE device. but these steps you can also follow for any other brand radio to the configuration. please comments and send mail us if you have the question related to this tutorial.
Related Post
- How to Setup Tenda TE-D151 ADSL Modem for Airtel and BSNL Line
- The 15 Best Wireless Range Extenders to Boost WiFi signal [Updated]
- Single band vs. Dual Band Wi-Fi Router! Which one is best?
