The simple quick setup configuration for Mikrotik WiFi router without using Winbox configuration utility. find the single page configuration guide for Mikrotik hAP mini wifi router configuration first time.
MikroTik hAP mini WiFi Router configuration for Home
Mikrotik hAP mini is a small wifi router for small size home with 3 Ethernet ports.It is a classic look mini wireless router for 1Bhk size house wifi. HAP mini supports all the features like other high-end wifi router series of Mikrotik router boards. hAP mini can be placed at the desk because it looks impressive. It is an ideal wifi router for small office and café coffee day, pizza shop and other small applications. This wifi router Having 1 WAN and 2 LAN port to use as router mode and connect wifi as well as the wired device to networks.
Most of the people think the configuration of Mikrotik router using winbox is a bit complicated. But there is also an option available for beginner’s quick set option to configure Mikrotik router in a single page without facing complicated configuration steps. I have made this tutorial with single steps configuration without struggling for setup Mikrotik hap mini wifi router. Check out MikroTik 10 Best Device for Internet Service Providers
Mikrotik hAP mini Tiny Size WiFi router Connection Diagram
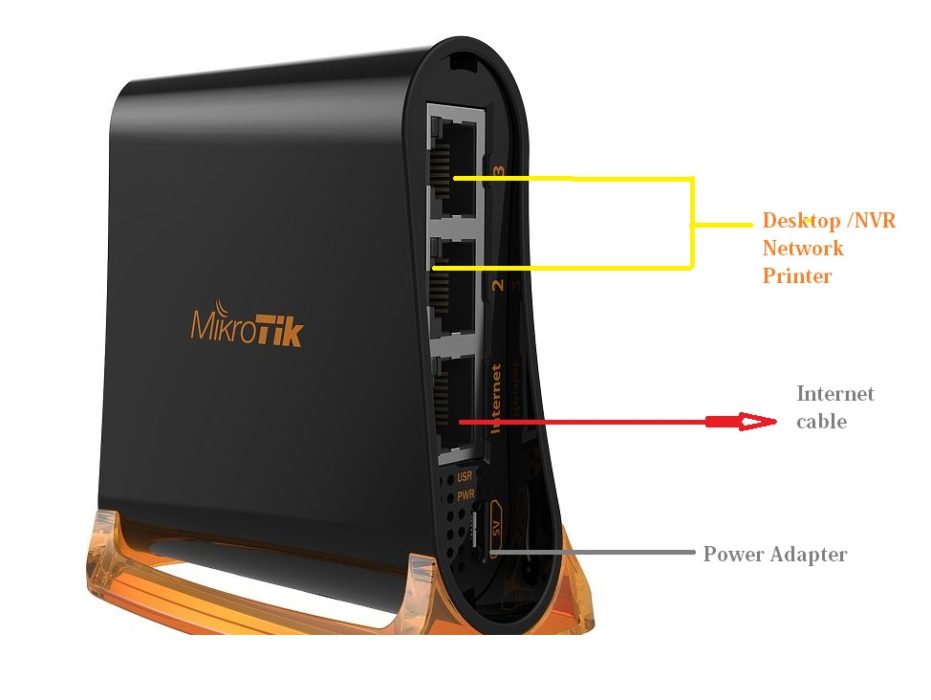
The first step of configuration is the physical connectivity of the router with internet cable and PC/Laptop. hAP mini 2.4 GHz wireless router having 1 internet port and 2 LAN port for local connectivity.
Port Number 1 (Intenet) will connect to your internet cable coming from your internet service providers. Port number 2 & 3 LAN port connects to your PC/Desktop to configuration purpose.
Power on the device with the DC port as shown below image. Use the power adapter that comes with Mikrotik hap mini box accessories.
Mikrotik hAP mini Configuration without Winbox
hAP mini configuration is done without Winbox configuration utility of Mikrotik.
You can easily configure any Mikrotik route board directly from the internet browser as used by any other wifi routers.
To configure using the web browser you must know the default IP address of Mikrotik hAP mini wifi router.
Default IP is 192.168.88.1
Username- admin
Password – NA (no password set on default mode)
Desktop/Laptop LAN Configuration: You have to use the Static IP address of 192.168.88.X series in your PC/Laptop. EXP: use 192.168.88.10 in PC LAN.
Or make DHCP on your Laptop/PC LAN settings.
See here how to configure LAN IP Address for Laptop/Desktop.
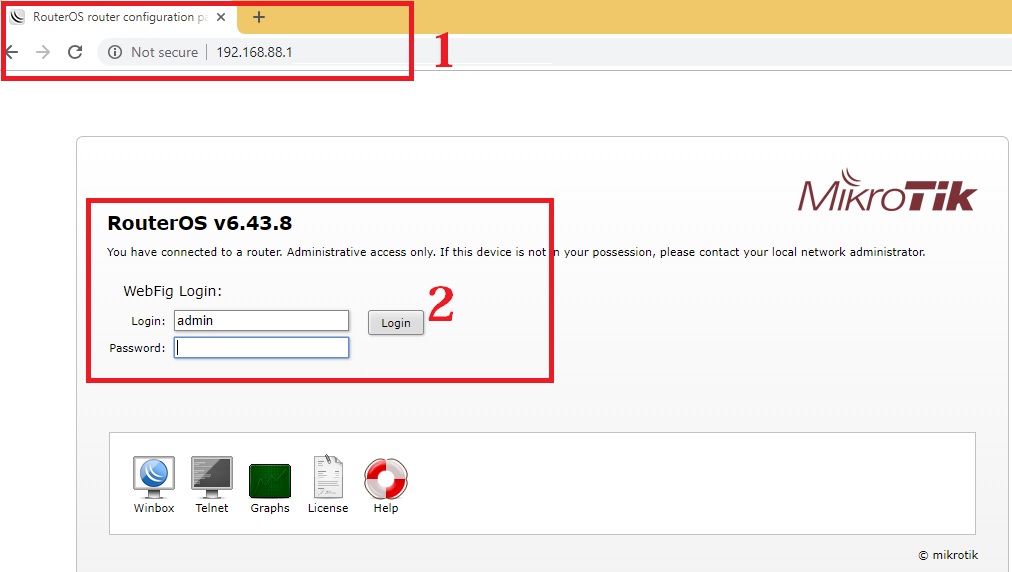
1: Open an internet browser such as internet explorer, Mozilla, Google Chrome, and type 192.168.88.1 and hit the enter key.
2: If hAP mini in default mode it will direct login but if you have changed you have to provide a username and password to login.
To make simple configuration for hAP mini wifi router configuration steps divide into a different part.
1: Internet (WAN) Port Configuration for Static or PPPoE
2: LAN and DHCP Server Configuration
3: Wireless Name and password Configurations
Mikrotik hAP mini WiFi Router WAN Configuration
The motive of splitting the configuration part to make it easy and rememberable for the lifetime. When entering into the Quick-set option you will get all the settings in a single page and you may get confused about where to start the configuration. After reading these steps you can configure any MikroTik router without fear of too many settings on the single page. Just follow the step in serial to configure hap mini.
1: Go to the Quick Set option from top left tabs.
2: Mode: use the Router mode.
3: Internet Settings: Configure WAN IP Address or PPPoE username in this option as provided by your internet service providers.
Here I am using Static IP Address to configure my internet.
You can choose DHCP(Automatic)/PPPoE also from the list.
IP Address: provide static IP address here given by your internet service providers..
Subnet Mask: same provided by your internet providers.
Gateway: also got from ISP.
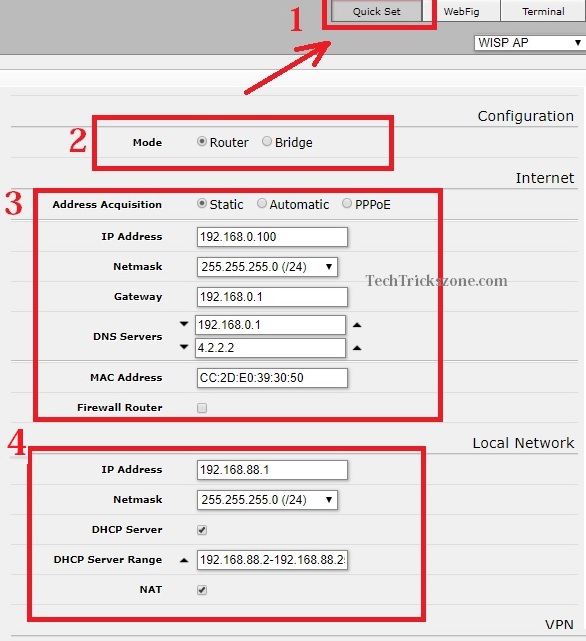
4: LAN and DHCP Server Configurations
Local Network: in this option you can change LAN IP Address if you wish to change the default to any other. You must change if you are using more than one microtik router in the same network. Using a single Mikrotik device keep it with the default IP Address.
IP Address: change the new IP Address in this box.
DHCP Server: checkbox to enable DHCP server.
DHCP Server Range: set the DHCP server range if you want to specify any range provide to users.
NAT: NAT option must be unable to work in router mode. Check the box to enable NAT in Mikrotik hAP mini wifi router
Apply Setting after complete Network configuration part from bottom apply configuration button.
![]()
HAP Mini Wireless router WiFi Name and Password Settings
In this section, you need to change default Mikrotik WiFi SSID and set wifi password to protect your wireless network.
Wireless
Wireless Protocol: 802.11
Network Name: Type WiFi name here.
Frequency: use Auto or Select the channel from list 1-13 as per your country support.
Band: use 2GHZ BGN
Channel Width: 40MHz
Country: select your country name from the list to follow telecom guidelines.
Security: Select WAP and WPA2 (recommended).
Encryption: AES ccm (select)
WiFi Password: type password for your hAP mini wifi network.
After all the settings press the Apply configuration button to save settings
After apply settings, your Mikrotik hAP mini WiFi router configuration finished and ready to use in live network. Ethernet port 2 and 3 you can connect yo wired device such as Desktop, NVR, Network printer and any other device which support only wired connections.
Related Post
- How to use WiFi Router as WLAN Adapter for Xbox and NVR
- What is the use of Different Wireless Mode in WiFi Router?
- How to connect two Wi-Fi routers Without Cable wirelessly
- What is the use of Different Wireless Mode in WiFi Router?
