
Simple steps to setup Apple airport time capsule using Airpot Utility to configure for your home internet.
How to Setup Apple Airport Time Capsule?
Apple Airport time capsule is an Ultrafast 802.11ac Wi-Fi with 2TB and 3TB hard drive capacity. Airport time capsule supports dual-band 2.4GHz and 5GHz bands to provide you best internet speed and connection stability. Apple Airport wireless router best for home and office use to use backup solutions as well as wireless connectivity with a single device. An airport time capsule can be configured with airport utility which is available for Mac OS and Windows also.
Apple Airport time capsule gives you 1 Gigabit WAN and 3 Gigabit LAN to connect your desktop with a wired connection. 1 USB port available for printer and flash drive shares a purpose with an inbuilt power supply.
As the Apple brand is known as a secure product you can use the airport time capsule to make a secured wireless network. If you are a Max OS X user then it’s beneficial for you to get your auto back from an airport time capsule of your sweet memories and other files.
Apple Time Capsule 2TB ME177HN Wireless Configuration
Configuration of the Apple time capsule required Airport utility from Windows as well as Mac OS. You can download airport utilities from the official Apple website.
Download AirPort Utility 5.6.1 for Windows
With Airport Utility you can configure, and manage your Apple devices from Windows and Mac OS.
Download AirPort Utility 6.3.1 for Mac
After downloading the AirPort utility follow the steps to configure your time capsule 2TB and 3TB.
After Downloading the Airport utility installs see further instructions for the configuration process.
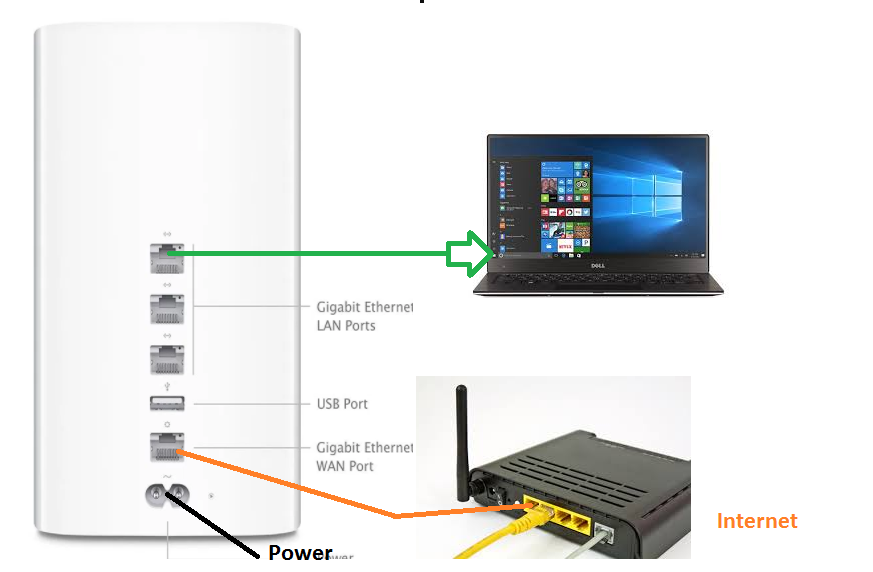
Apple Airport Time capsule 3TB Connection diagram
To configuration of the Apple time capsule required a wired or wireless connection to the Laptop or PC. As shown below picture power on the Apple time capsule with power cable comes with a box and WAN port connect to the internet modem/router. You can connect a Laptop/PC with a LAN port or wireless connection.
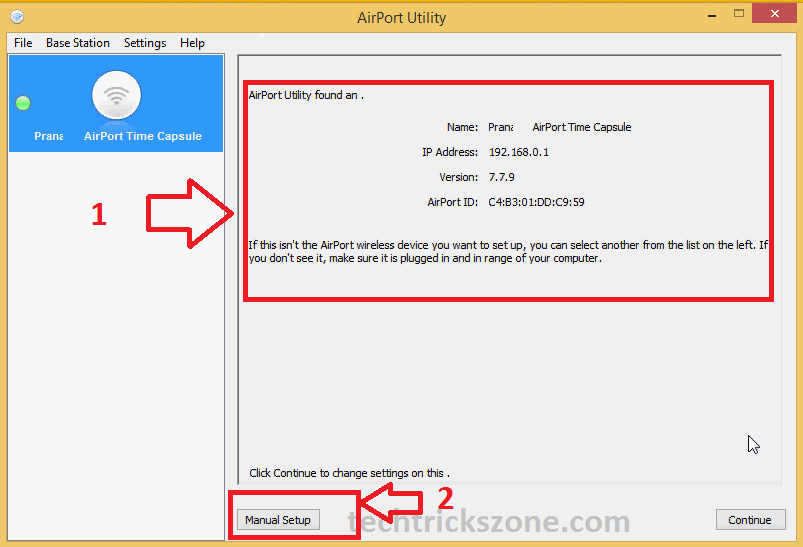
Apple Airport Time capsule 3TB Login with Airport Utility.
Once you have connected properly to a time capsule then open the airport utility, and it will take a few seconds to detect your Time capsule device and will show your IP Address and other device information.
1:- On the status page, you can see the Device name, IP Address, Firmware version, and Device MAC ID details.
2:- To login to the device Click the Manual Setup button as shown in the picture.
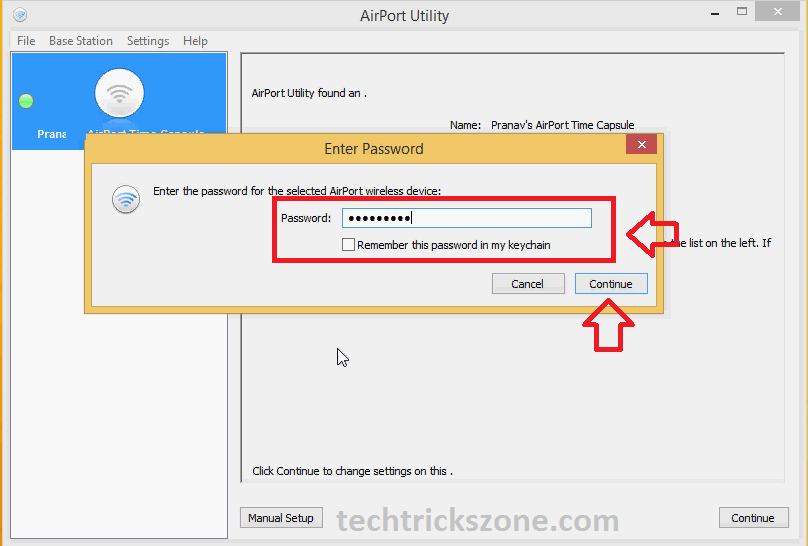
You will be prompted for the password enter option
Apple Time Capsule Default password – admin
Use the admin password to log in the first time or use your changed password.
Click the Continue button to log in to Apple Time Capsule.
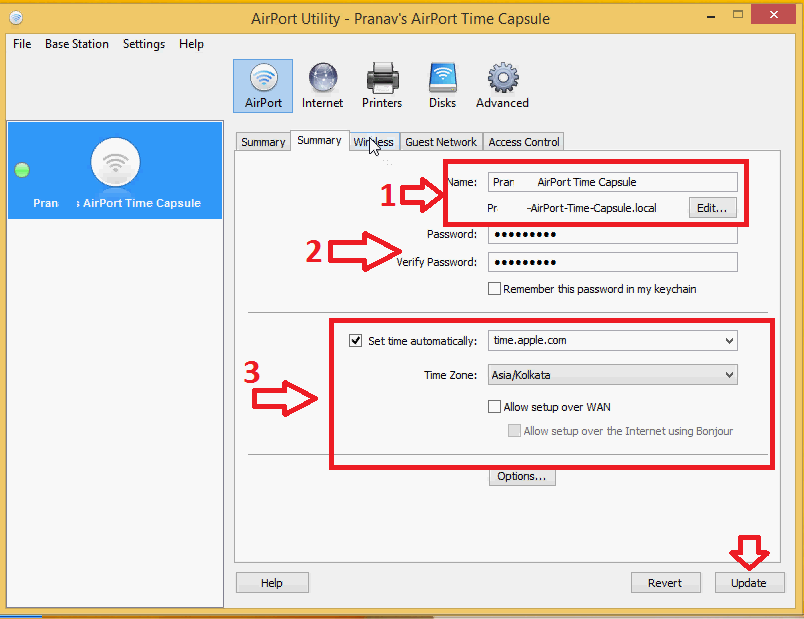
Apple Time Capsule 2TB Name and Login Password Change
If you are going to install the Apple time capsule the first time, then you can change the default time capsule name and login password to protect your device.
Go to the Summary tab to change the name and password.
1:- Name – change Name in this box
2: Change and verify the password to confirm and avoid a miss-match.
3:- Choose the country to get the right time zone for your device according to location.
Click the Update button to save settings.
See Also High Quality (HD+UHD) Video Calling Messenger for Android, Windows,I Phones and Linux
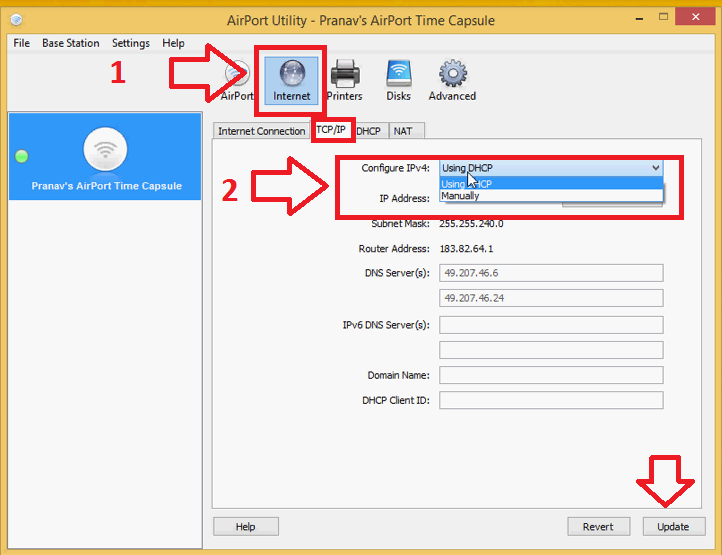
Apple Time Capsule 2TB Me177hn/a WAN Configuration for the internet
To configure an Apple time capsule with your internet connection requires WAN configuration. Connect your internet cable to the WAN port and configure the WAN setting according to your internet provider’s internet settings.
- Go to the internet icon on the top list
- Click the TCP/IP tab
Configure IPv4- Choose your internet connection type
Exp- If your ISP has given your static IP or PPPoE then select the Manual option and choose Static or if your ISP gave your PPPoE user name password then select PPPoE from the list.
Click the Update button to save changes.
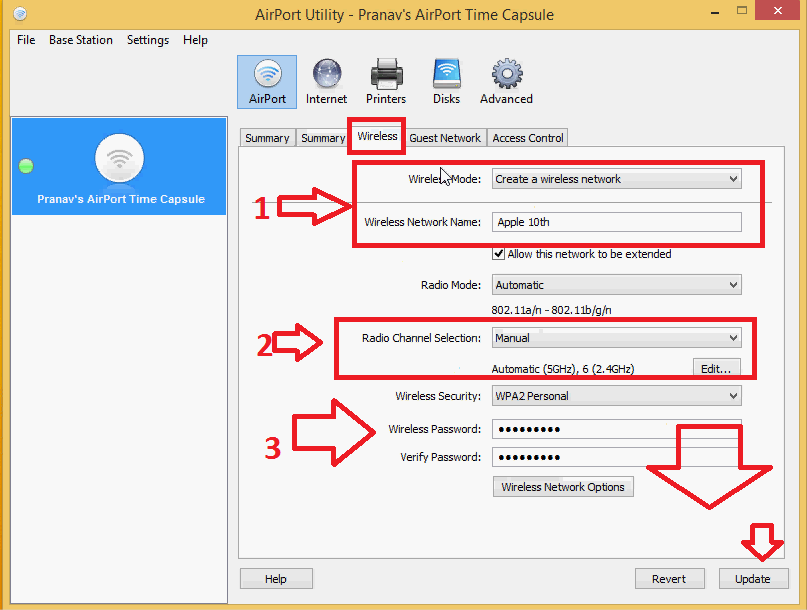
Apple Airport Time Capsule 2TB Me177hn/a Wireless configuration
The second step are the configuration of the wireless to change the default wireless name and password. Always change the default WiFi name and password to keep your WiFi internet from unknown access.
Go to the Wireless tab inside the Airport option.
1:- Wireless Mode – To create a wireless network use this option.
Wireless Network Name- Use your Apple Time Capsule Wi-Fi name here
Radio Mode- Keep this option automatic.
2:- Radio Channel Selection – If you are using more than one Wireless device in the same place than choose a manual option and set the channel number manually to avoid interference with other Wi-Fi networks.
3:- Wireless Security – Recommended is WPA2PSK
Wireless Password– type your Wi-Fi password here
Verify Password – type the password again to confirm.
Click the Update button to save settings.
how to fix internet connection problems and WiFi Problems
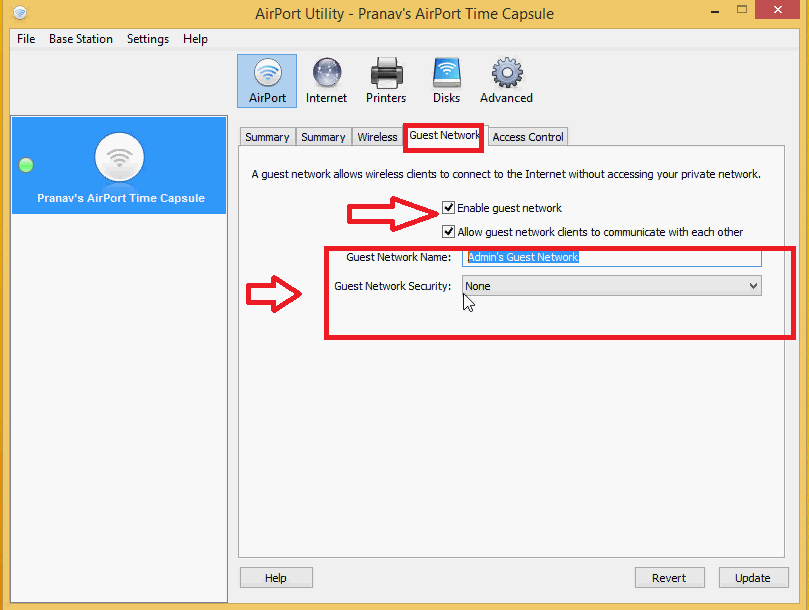
Apple Time Capsule 2TB Me177hn/a Guest Network Configuration
You can enable the guest Wi-Fi network on your Apple time capsule device for temporary internet access. If you have a configured guest network then you do not need to share your main Wi-Fi password to anyone just give the guest network and keep protecting your Apple Time Capsule device.
Airport- Guest Network
Enable the Guest Network option
Guest Network Name– Use the Guest Wi-Fi name in this box
Guest Network Security– type the guest Wi-Fi password in this box.
After done click the update button.
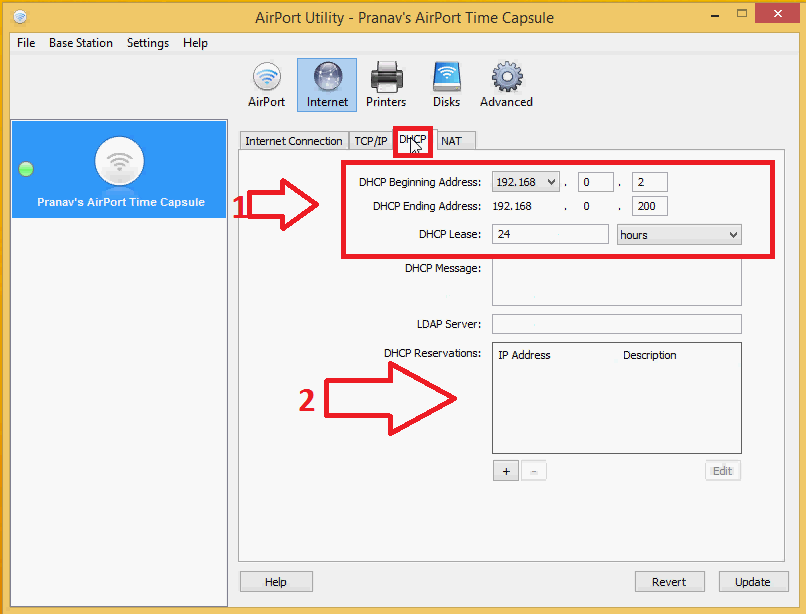
Apple Time Capsule 2TB Me177hn/a DCHP Configuration.
To DHCP configuration on the Apple Time capsule device after login go to
Internet- DHCP tab
1:- DHCP beginning Address- use the IP Address you want to start for DHCP
DHCP Ending Address – Use the last IP Address you want to use in the DHCP
DHCP Lease – You can increase lease time as
2:- DHCP Reservation – if you want to reserve any IP such as printer IP address or any other server IP address you can put the IP address in this box.
Press the Update button to save settings.
After doing all the setting steps properly you can start using your Apple Time Capsule router device.
Hope this simple user manual to setup apple airport time capsule will help you to setup your device to protect your internet.
Related Post
- How to login Actiontec V1000H VDSL
- Frontier Router Login IP Address 192.168.254.254
- 192.168.1.1 Login Technicolor Router
- Login AT&T Router IP address 192.168.1.254
