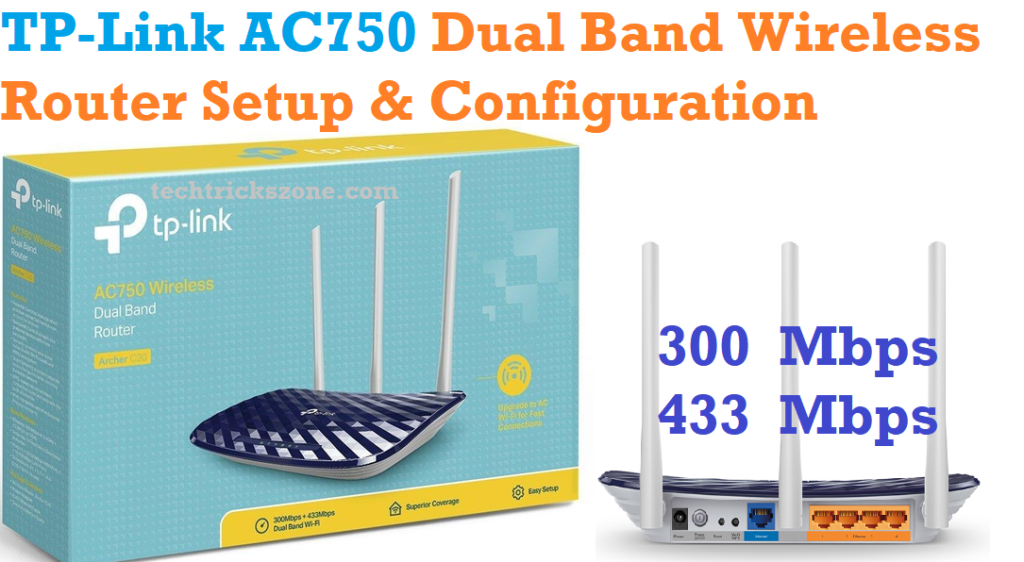
TP-Link AC750 Archer 20 Dual Band Wireless Router Configuration
TP-Link AC750 is a Dual-band (2.4 GHz + 5.8 GHz) wireless router with 750Mbps speed. AC750 is an archer 20 wireless access point which is suitable for home and enterprise purposes. Ac750 Wi-Fi router physical interface 4LAN+1WAN port with 10/100 Mbps speed. TP-Link AC750 having 2X2.4GHz Omnidirectional and 1x5GHz Omani directional antenna to give a better signal range for your home and office. AC740 supports 433 Mbps in 5 GHz and 300Mbps in the 2.4GHz band so the combined wireless speed is 733Mbps. making a correct Tp-Link AC750 configuration will increase your Wireless performance as well as the protection of your network.
This post will describe to you an easy and proper configuration guide for the TP-Link AC750 Dual-band Wi-Fi router first time. I always try to give step to step user guide manual for all the Wi-Fi router but if you face any confusion in any settings posted in this article please don’t forget to comment or mail us.
Before starting, the configuration manual of the TP-Link AC750 Dual-band Wi-Fi router follows the physical connection diagram and ready your Internet settings to start the configuration.
TP-Link C750 Dual-Band Wi-Fi Router Connection Diagram
In this diagram TP-Link, AC750 will be configured as a router mode. In router mode, WAN connection is required in the WAN port and LAN port will connect to PC/Laptop.

After connection access Wi-Fi router to laptop/desktop from the browser. To access the router web interface you should configure your laptop/desktop LAN IP with the same series of TP-Link AC750 IP addresses.
TP-Link AC750 Dual Band Wi-Fi router Login from Desktop
If you don’t know your router’s default IP Address. Get the default IP Address and username password from here
TP-Link AC750 Default IP is – 192.168.0.l
The default username and password is admin/admin
Open the browser type default IP http://192.168.0.1” and hit enter.
Use admin/admin for login.
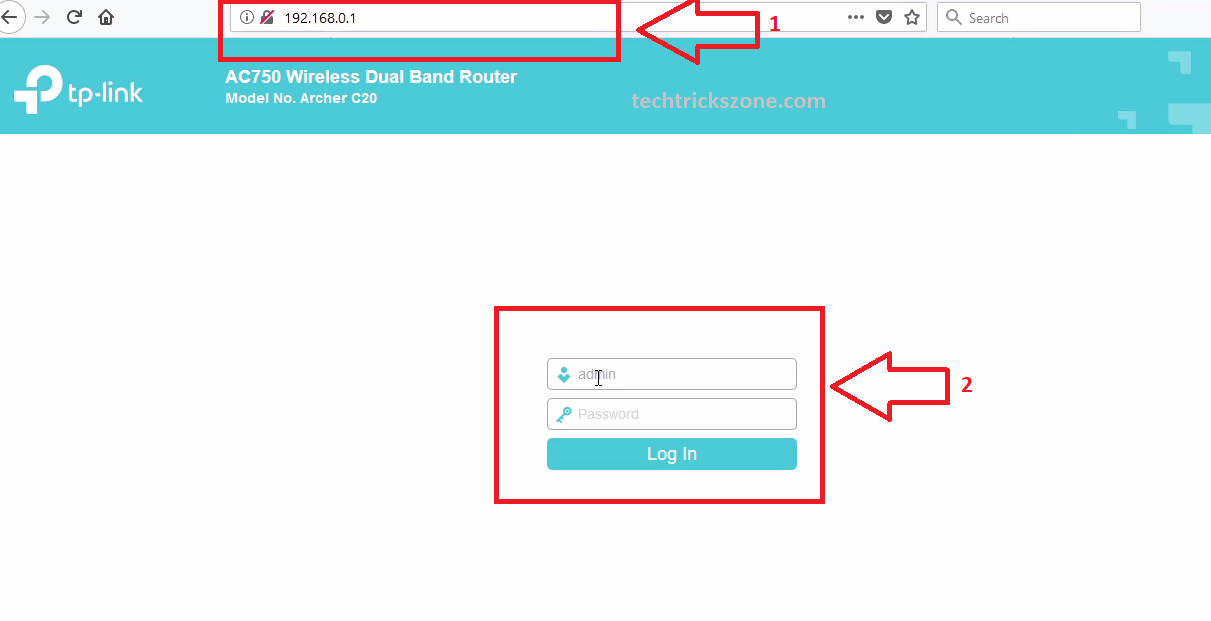
If you forget your Wi-Fi router settings after change just make it factory reset by pressing the reset button for the 3-5 second.
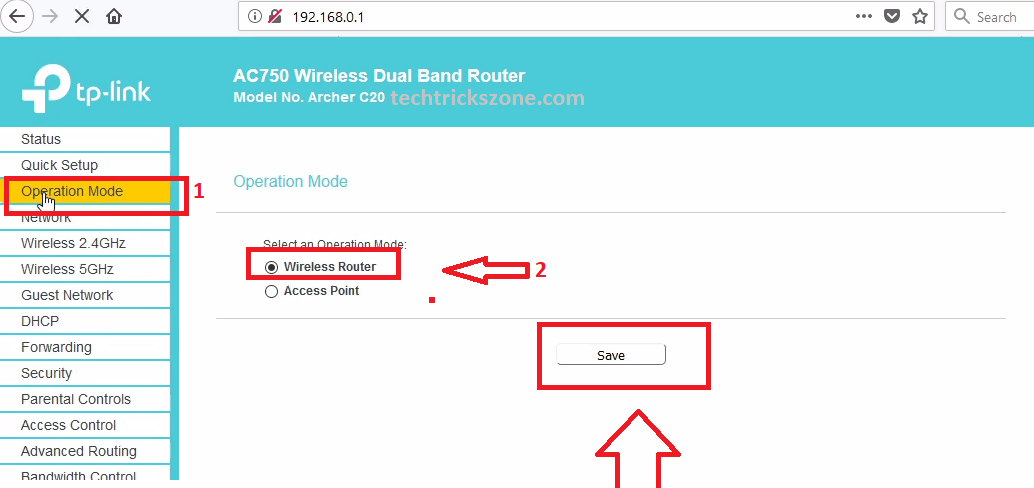
AC-750 Dual Band WiFi Router Operation Mode change
To configure any WiFi router first step is choosing the operation mode we want to use as.
To change TP-Link AC750 Operation mode click on the side menu list. Find the operation mode option.
Operation Mode- Wireless Router and click save
After operation mode, WAN configuration is the next step to configure any router in an easy way.
Read More
- How to block a Website and Apps on basic WiFi Router
- Best Dual Band WiFi router under 2000 Rs for 100+ Mbps Internet Plan
- How to Solve 10 Common internet and Wi-Fi problem in Home and Office
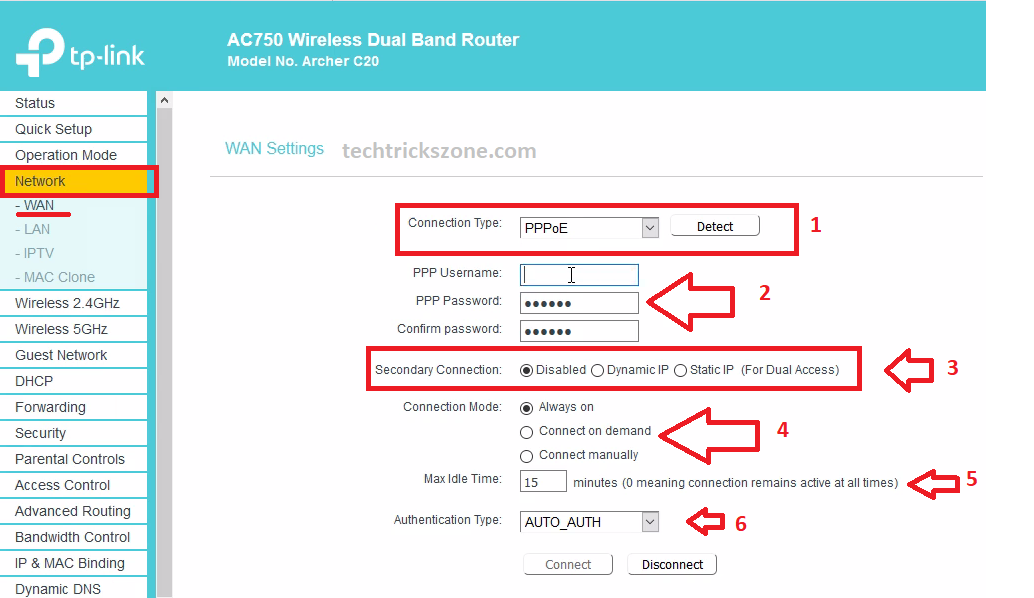
TP-Link AC750 Archer 20 WAN Configuration in PPPoE Mode
TP-Link AC750 wifi router supports PPPoE, Static, and DHCP network types in wan. First will so how to configure the TP-Link AC750 dual-band Wi-Fi router in PPPoE mode.
To WAN configuration
Go to Network- WAN
- Connection Type- PPPoE
- PPP username – ( use the username given by your ISP- if you don’t know contact your service provider.
PPP Password – same given by ISP.
3:- Secondary Connection– this option if you are using more than one internet service provider you can use second connection with Static or dynamic type with this option.
4:- Connection Mode- keep it always on
5:- Idle time chosen according to you. It’s a time when your internet not using and it will disconnect for a while.
6:- Auto_AUTH keeps this option.
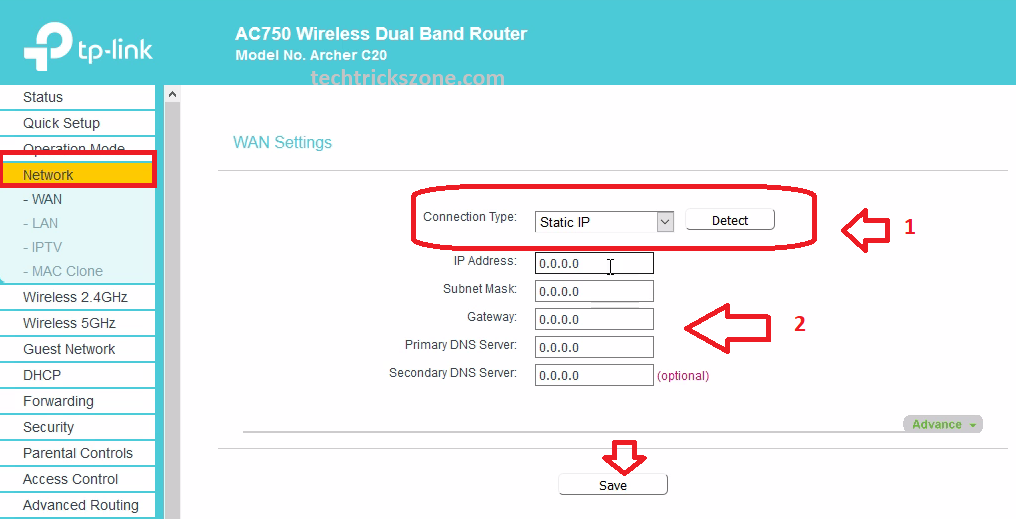
TP-Link AC750 Archer 20 WAN Configuration in Static Mode
Now, this step will cover TP-Link AC750 in static connection type. In this method, you require an internet IP Address and other details provided by your ISP.
Connection Type – STATIC IP
IP Address- use the IP provided by SP
Subnet Mast- same by ISP and Gateway and DNS server also provided.
Click Save button to save WAN settings.
Next steps are Configuration of LAN and DHCP server in the WiFi router.
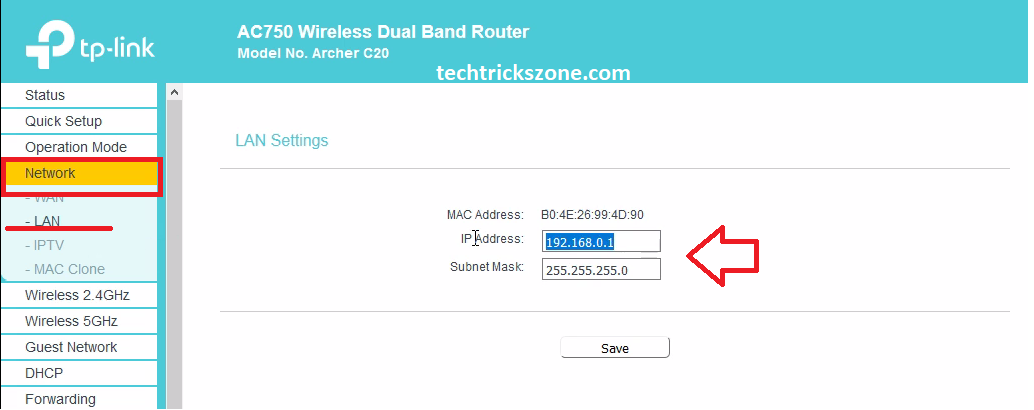
TP-Link AC750 Archer 20 LAN & DHCP Server Configuration
In the new router, OEM default IP is configured so always recommended to change the default IP to protect your Wi-Fi network from unwanted activities.
Network-LAN
IP Address- Change new IP here
TP-Link AC750 DHCP server Configuration.
DHCP Server– Enabled
Start IP– you can choose the start IP as per your network size
End IP- choose the end IP as per users in the home and office.
You can use the DNS server here which will get in the client IP configuration.

After the DHCP server now is the time to configure Wireless settings. As AC750 is a dual-band wireless router so Wireless configuration is divided into two parts.
-
2.4Ghz Wireless Configuration
-
5 GHz wireless Configuration.
TP-Link AC750 Dual Band Wi-Fi Router 2.4GHz Wireless Configuration
All mobile and laptops support the 2.4 GHz wireless band so first we will configure a 2.4 GHz Wi-Fi network.
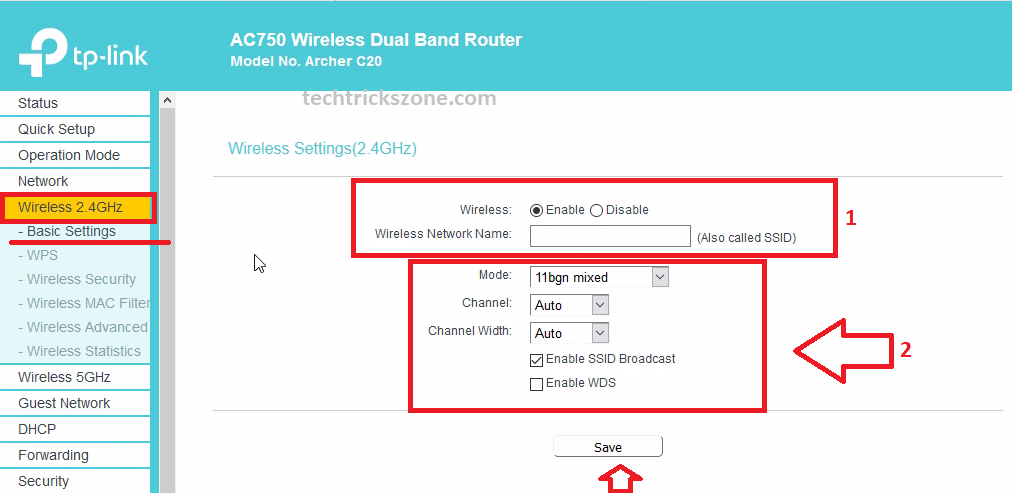
Go to Wireless 2.4 GHz
- Wireless –Enable
Wireless Network Name– type your WiFi name in this box for 2.4GHz
2: Mode- keep it BGN mixed
Channel – Recommend using 1,6,11 if using more than 1 wifi router.
Channel Width- keep it auto.
Enable SSID Broadcast- keep it check otherwise your wifi will hide.
TP-Link AC750 Wireless 2.4GHz Password Configuration
Security is a must for the Wi-Fi network to ensure a protected wireless network.
Go to Wireless 2.4GHz- Wireless Security option.
WPA/WPA2- personal is highly recommended to make stronger security for the WiFi network.
Version- WPA2PSK
Encryption- AES
Wireless Password- Type the password for Wi-Fi in this box.
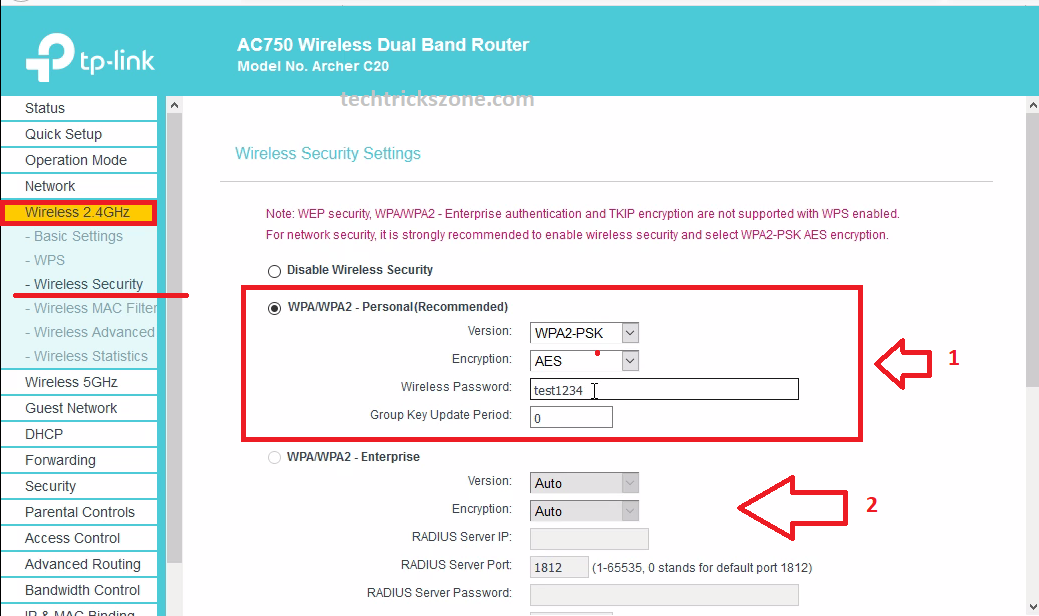
- WPA/WPA2-Enterprise- its use for radius server authentication which mostly use in an enterprise or large network to do authentication from radius server.
TP-Link AC750 Dual Band Wi-Fi Router 5GHz Wireless Configuration
All latest mobile comes with dual-band WiFi so 5Ghz is also required to configure for making a high-speed wireless connection with mobile and Laptops.
Go to Wireless 5 GHz
- Wireless –Enable
Wireless Network Name– type your WiFi name in this box for 5GHz
2: Mode- keep it 11a/n/ac mixed
Channel – Recommend using a legal channel according to your Channel or keeping auto if using a single WiFi router
Width- keep it auto.
Enable SSID Broadcast- keep it check

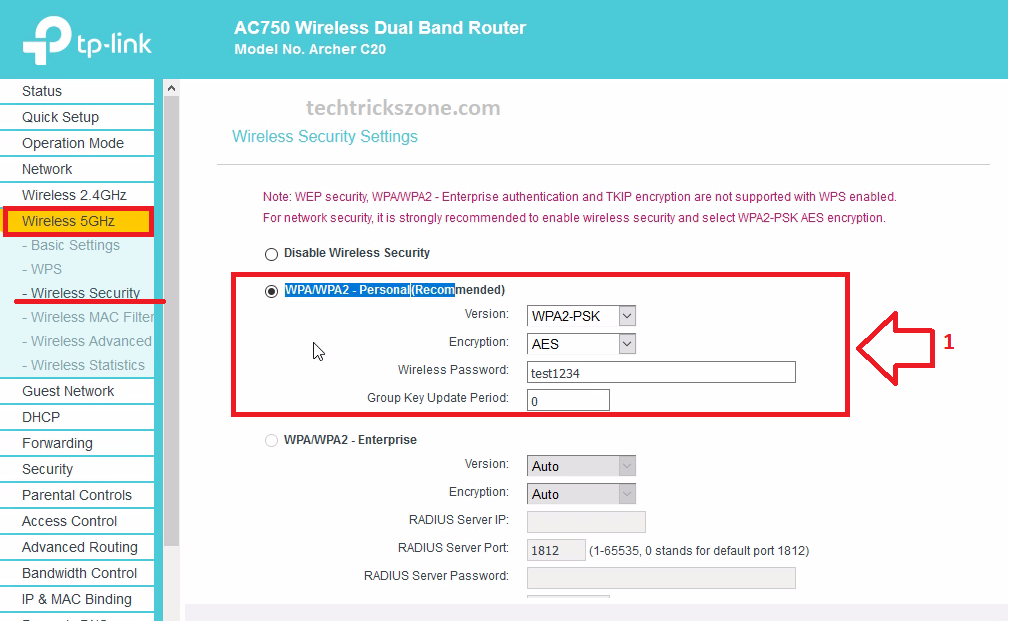
TP-Link AC750 Wireless 5GHz Password Configuration
Security is a must for Wi-Fi networks to ensure protect the wireless network.to make your WiFi internet secure from attackers you must follow a correct Tp-Link AC750 configuration guide.
Go to Wireless 5GHz- Wireless Security option.
WPA/WPA2- personal is highly recommended to make strong security for the Wi-Fi network.
Version- WPA2PSK
Encryption- AES
Wireless Password- Type the password for Wi-Fi in this box.
We have successfully configured both Wireless bands but if we are using TP-Link AC750 in the office then we must configure a guest network. Configuring a guest network in the TP-Link router will prevent us from providing our main Wi-Fi password to everyone who is not a permanent employee of the office.
TP-Link AC750 Dual-band WiFi Router Guest Network Configurations
To configure the Guest network in your TP-Link route follow the steps given below.
1-Allow Guest network to access My local network – Enable
2-Band select- choose the band you want to create the guest network ( if you want to create both 2.4G and 5G guest network then configure the one by one both band.
Network name- type guest network name in this box.
Security- use the Guest WiFi password in this box.
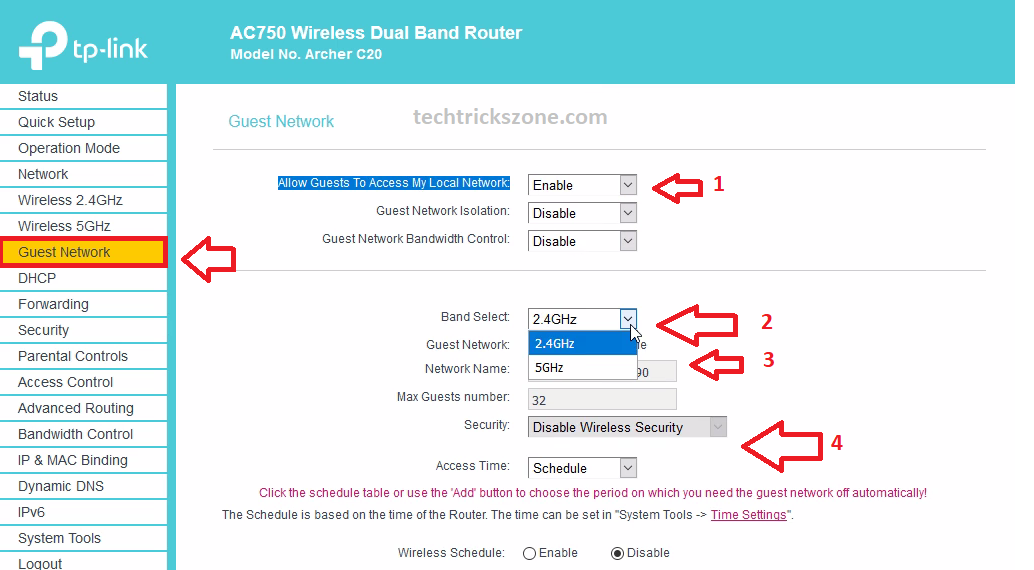
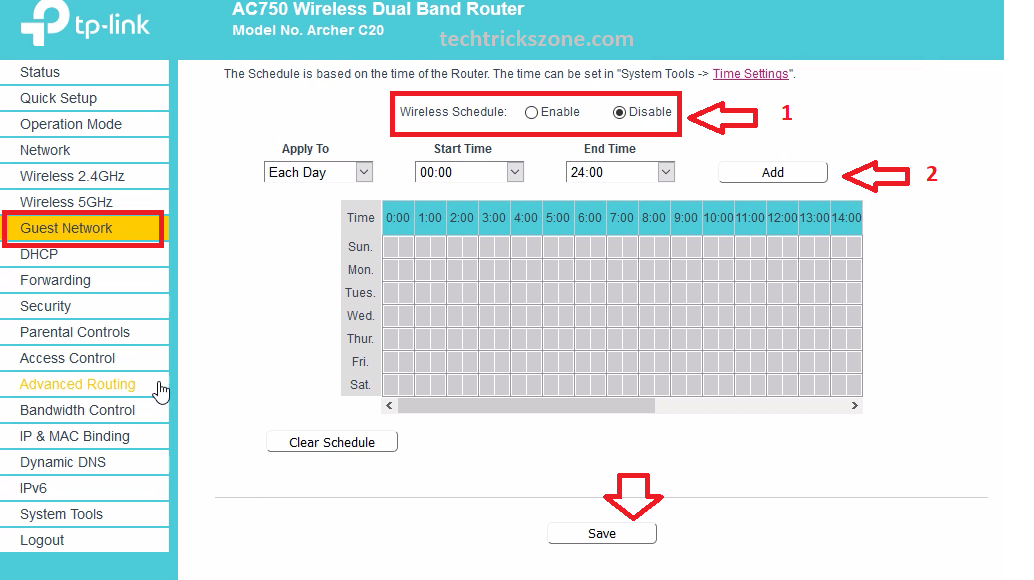
TP-Link AC750 Wi-Fi router Guest Access Schedule
If you want to guest network only work on any particular time such as office hours then you can manage it by enabling Access time.
Access Time- Schedule – (Above image)
- Wireless Schedule – Enable
- Choose the weekday you want to enable a guest network. You can choose Guest network access start time and end time to manage your office hours.
This is the basic Wireless Configuration and Setup manual for the TP-Link AC750 Dual-band WiFi router.
Download TP-Link AC750 Firmware Now
Related Post
- TP-Link Deco M5 Mesh WiFi System Setup and Configuration (with Picture)
- 192.168.1.1 Login Spectrum Sagemcom Wave2 Router
- TP-Link Talon AD7200 Multi-Band Wi-Fi Router Setup and Configuration
- TP-Link SG3424 L2 Managed Switch Port isolation and loop detection configuration
