Flying Voice G201N4 Mini VoIP Wireless Router Configuration
Flying Voice G201N4 mini VoIP Router supported 1 FXS 4 LAN port 1 USB port and WLAN, G201N4 supported 5Volt 2Amp DC, it’s a Voice over internet protocol router with Wi-Fi and Ethernet supported for wired connection, G201N support sip server and Wan support Dynamic, PPPoE, static IP. G201N4 is able to make calls via SIP proxy voice communications, plus the IP sharing, and the QoS mechanism. The USB port can make the user to connect external storage devices make it easy to share the file via Flying Voice VoIP Wireless router. Its comes with 2dBi Omni Directional Inbuilt Antenna for IEEE802.11n 1T1R Wireless which provides internet Wi-Fi Access. If you are looking for configuration of any flying voice routers then you are in the right place .here you will get a complete manual of Flying Voice G201N4 Mini VoIP Wireless Router Configuration.
Flying Voice G201N4 Mini VoIP Wireless Router can be configured three ways
(1)Use IVR
(2)Use Web
(3)Use Provision.
How to check who is using your Wi-Fi from Mobile (3 Way)
Web Configuration: Voice G201N4 Mini VoIP Wireless Router
Default IP is 192.168.1.1 and the default username admin, password is admin also. To proceed to web configuration please go throw the network connection of G201N4 VoIP Wireless Router.
Step 1.Connect Line port to landline jack with an RJ-11 cable.
Step 2.Connect the WAN port to a modem or switch or router or Internet with an Ethernet cable.
Step 3.Connect one port of 4 LAN ports to your computer with an RJ-45 cable. This device allows you to connect 4 PCs directly.
Step 4.Connect one end of the power cord to the power port of this device. Connect the other end to the wall outlet of electricity.
Step 5.Check the Power and WAN, LAN LEDs to assure network connections
Access Flying Voice Router to web
After proper connection of router open go to your Laptop/Pc and put 192.168.1.X series IP address to Lan IPv4 Properties.
See how to configure IP Address in Laptop / PC Lan
open web browser and access http://192.168.l.l and press enterkey.default username admin and password admin.
Flying Voice Mini VoIP Wireless Router Network Configuration
Go to WAN– Configure your ISP IP address
Choose your internet type such as PPPoE, DHCP, Static mode-
If you do not know about it contact your internet provider and as for details about PPPoE username password, Static IP address, and other details.
LAN: use private IP series to local IP Address.

Flying Voice G201N4 Mini VoIP Wireless Router Wireless Configuration
Follow the below picture for Wireless Configuration
Wireless Connection Mode – AP (Access point should select for Wi-Fi AP)
SSID – type wireless Name for flying voice Wi-Fi network name in SSID box
Frequency (Channel)- if you are using single router you can keep it auto mode but if you are using more than one Wi-Fi router user channel number 1,6,11 to avoid interference due to overlapping of frequency.
After done all settings click Save an apply button.
 and Flying Voice Mini VoIP Wireless Router")
Flying Voice G201N4 Mini VoIP Wireless Router SIP Configuration.
Go to SIP account –> SIP setting

Flying Voice G201N4 Mini VoIP Wireless Router Configuration of Phone
Go to Phone –>Preferences
Regional – Choose your country from the list.
Fill the setting as per your country’s telecom supported parameters.

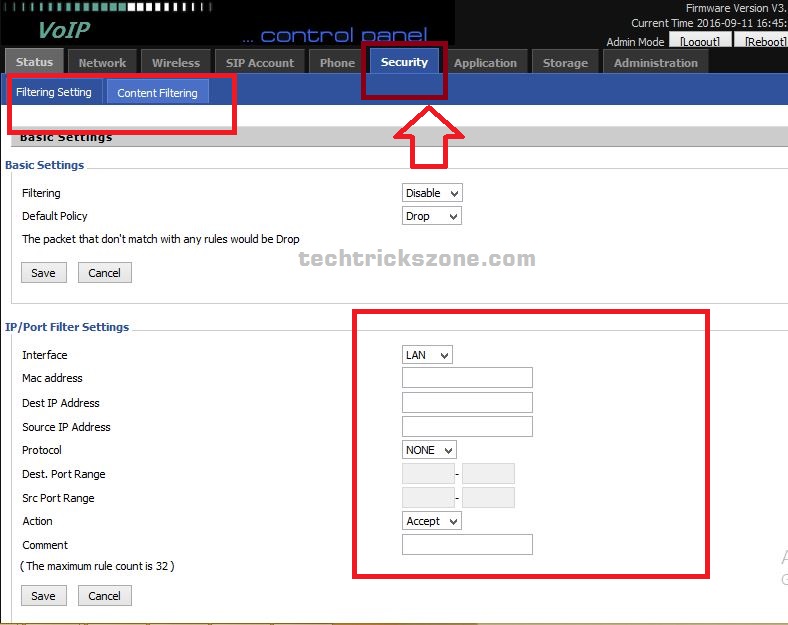
Flying Voice G201N4 Mini VoIP Wireless Router Configuration of Security .
In the security features you can configuration of content filtering and pot forwarding rule.

Flying Voice G201N4 Security Configuration
In security features you can configuration of content filtering and pot forwarding rule.
Flying Voice G201N4 Mini VoIP Wireless Router USB Configuration.
USB port to enable network sharing for your flash drive into network.

Flying Voice G201N4 Mini VoIP Wireless Router Administration Configuration
Administration provides to upgrade firmware, change user, and many other services which required in network.
Backup and Restore the Configuration file
The backup configuration option gives a safe option to keep your one-time configuration for further. Configuration Backup file required whenever you want to change flying voice outer due to miss behaving or break down. These steps save you lots of time and exercise to reconfiguring your router again when you need to replace it. You need to just download the config file after finish the configuration and restore it to the new router.
1: To download the configuration file go to the Administrator tab and Save config File option
Click the Download button to save the configuration file in the driver. Move it to save place so you can use it next time if your router factory reset or break down.
Restore Config file– To restore the configuration file click the Browse button and select the configuration file you have taken backup last time and click the Upload button to restore settings.
The router will take 20-30 seconds to restore settings and after reboot, your router will be configured with settings.
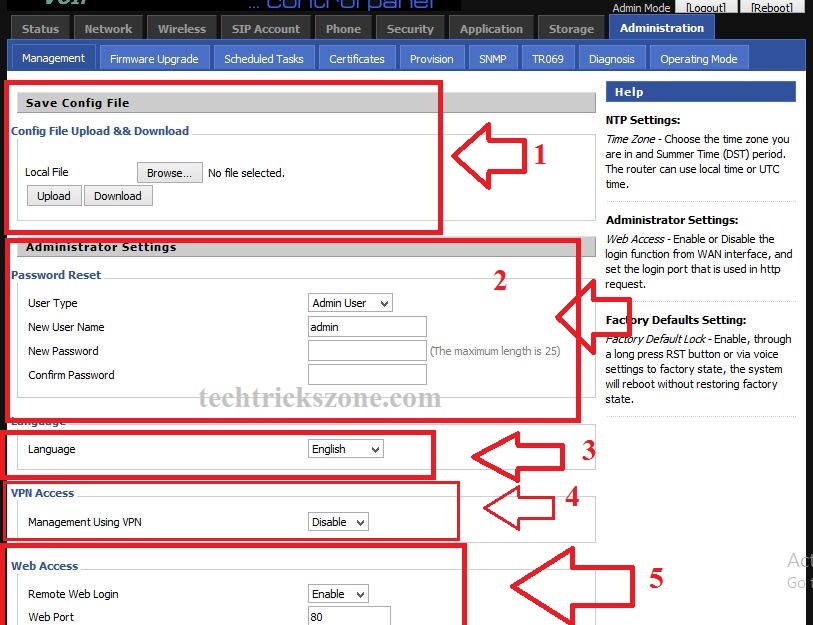
2: Flying Voice Administrator Settings
Administrator settings include access of router with admin rights. You can create and change access password for your router with this setting.
User Type– choose the user type you want to change or create a username and password
New username – type username for selected user type
New password- type password for same user you want to create
Confirm password- password confirmation for the same user name.
3- Language:
You can change your router language as per your country language. Go to language tab and select your language from list.
4: VPN Access –
If your network running in VPN network you can enable management access with your VPN tunnel to manage your flying voice.
Management using VPN- enables this option
5- WEB Access
By default, remote web login disabled for most of the routers due to security reasons but you can enable it as per your choice from the administrator tab.
Remote Web Login – enable this option ( if it disable you cannot access your router remotely through web interface)
Web port – by default 80 (you can change the port number according to your network if already used 80 with some other server or devices)
Related Post
- Login TP-Link Archer C24 Dual Band Router-[tplinkwifi.net]
- How to Website Block in Comcast Xfinity Router
- 192.168.1.1 Login Spectrum Sagemcom Wave2 Router
- How to Login Ubee DVW3201b Modem Router?
