This article contains the user manual for Login TP-Link Archer C1200 dual-band wireless router to setup and change WiFI SSID and PAssword and other
How to Login TP-Link Archer C1200 Dual Band Router?
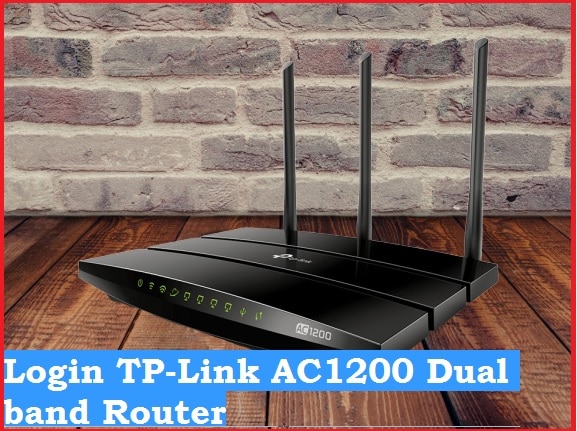
TP-Link C1200 dual-band wireless gaming router with up to 1200 Mbps WiFi speed. Archer C1200 one of the best and popular router for home internet plan more than 100 Mbps. The login steps for TP-link C20, TP-link C7, and Ac1200 are same to access the web interface. TPLink archer c1200 is 4Gigabit LAN port and 1 WAN port for wired connection. 1 USB port to connect pen drive and hard disk for USB storage. You will get a simple user guide to login TP-link Archer AC1200 Dual-band Router to change the WiFi SSID network.
However, you can access the C1200 web interface using WiFi or wired connectivity.
Steps to Login TPLink Archer AC1200 WiFi Router
You need to connect AC1200 router either wireless or wired connectivity to the login web interface.
- Connect AC1200 router using LAN cable from Ethernet port from Laptop/ Desktop.
- Power On a router with an adapter comes with the device.
- Connect Internet cable to WAN (Blue) Port.
- Make sure your PC/Laptop LAN IP Mode is DHCP to get ip address from Router.
AC1200 Default Login settings
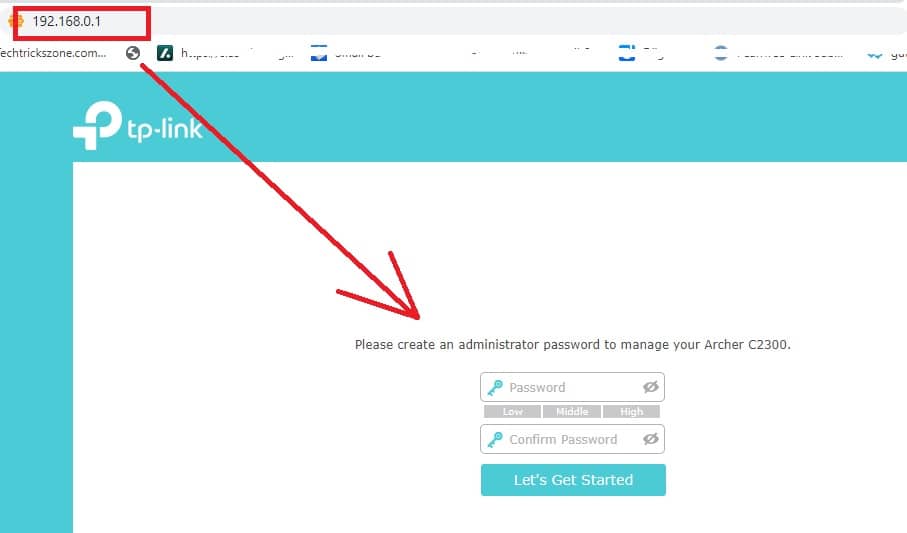
Default Login IP address – 192.168.0.1 or URL – tplinkwifi.net
Default username– admin or NA
Default Password-admin or create during first time login for some models.
Access TP Link AC1200 Web interface to the browser
Now open a web browser and access http://192.168.o.1 or tplinkwifi.net to open the router login page. If you have tp-link archer c6 ac1200 or TP-Link Archer C5 1200Mbps Wifi router than you can use this user manual to setup the same.
After a few movements you will get TP-link c1200 login page that asking to create a new password to get start router setup.
Please create an administrator password to manage your Archer C2300 WiFI router.
The setup guide is the same Archer C2300, C5400, and c1200, and other dual-band routers.
Create a login password using numeric and alfa combinations with special characters.
Press Lets get the start button to proceed to access router settings.
Once C1200 Router controls panel access now you can Setup WAN internet settings and Wireless Configuration.
Setup WAN settings for PPPoE or Static Internet
WAN port is important to set up to enable the router mode and NAT feature.
Go to Network- Internet option
Choose your internet type from PPPoE, Static, or Dynamic,
Provide a Dial-up username if the internet type is PPPoE that detail provided by your ISP.
If Static IP than provider static IP address, Gateway, and DNS information as provided by the internet provider.
Save settings and proceed to setup WiFi settings.
Change WiFi SSID Network Name
Wireless settings is the most important configuration to ensure the security of the internet.
Change the Default SSID network and enable the WiFI security option.
Go To Advance option
Wireless- Wireless Settings
2.4GHz Selected.
Network Name (SSID)- change WiFi name for 2.4G
Security Type– WPA/WPA2-personal (recommended)
Password- Set Wifi password as per your choice but avoid using weak passwords such as your name, address, mobile number, or date of birth.
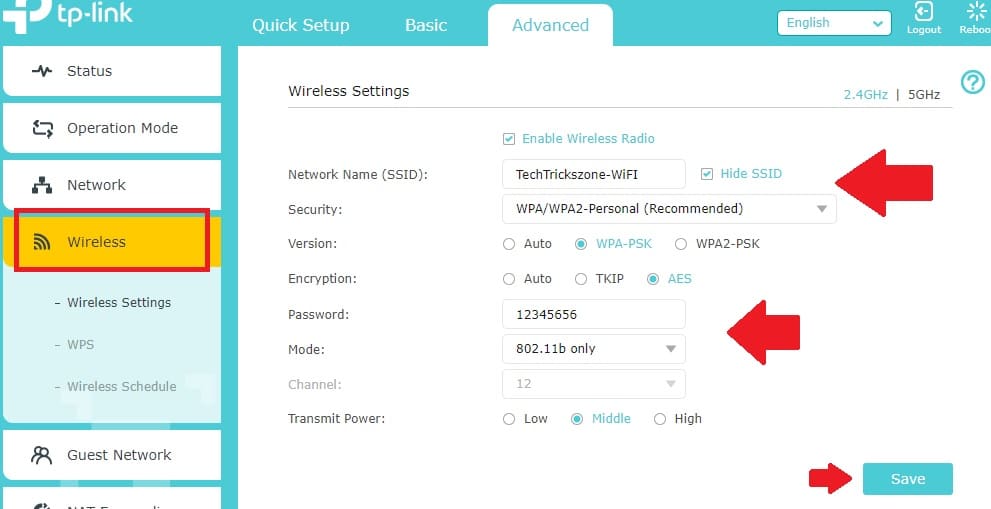
Increase TP-Link AC1200 Signal range- Choose Transmit Power- High
Press the Save button to apply the configuration.
Archer AC1200 is a dual-band Wireless router so do not forget to set up a 5Ghz band.
Click 5GHz option from Wireless settings and setup WiFi SSID and password.
After Wireless configuration changes Login password also to protect router access.
How to change TP Link Archer C1200 Login password?
Login username password is key to enter inside settings so always change login password while setup router first time.
Advanced- Administrator
Account Management
Old username- admin
Old Password- admin
New username: create a new username as per your choice.
New Password- Setup a new login password.
Confirm password- type new password again to confirm.
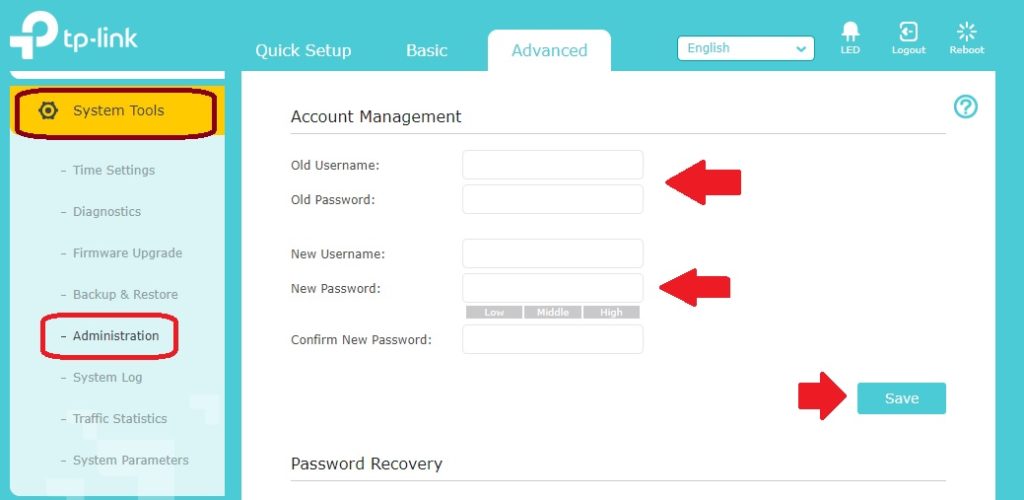
Password Recovery- to set up a password recovery option in case you forget password and want to recover password without reset.
Save settings and go to the WiFi option in mobile and laptop to check the internet should work with new WIFI names and passwords.
TP-Link Archer Dual-band router Login Issue Troubleshooting
If you are facing any error while login to C1200 Wi-Fi router than not to worry and follow steps to fix the login issue for TP-link Dual-band wireless router.
Fix Archer AC1200 Login IP Address Not Working
If you are not able to access the router web interface or you may be getting an error while access router default login ip address then follow steps to fix login error.
Step to Fix TP-link Router login IP not working
- Make sure the default login IP address printed to the router sticker you are using the same and already not changed.
- Check PC/Laptop LAN IP network should in DHCP mode.
- The computer should connect to the Router LAN port.
If Still facing a login issue you should factory reset router and follow login steps again.
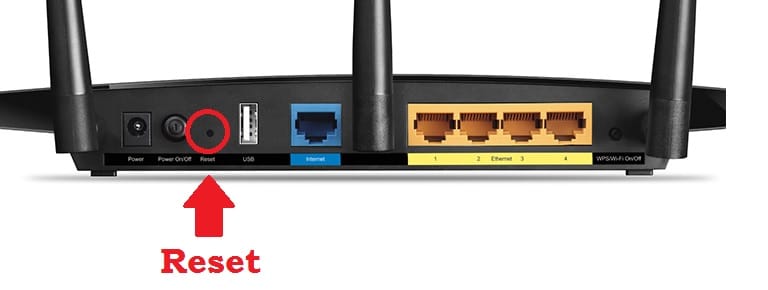
Factory reset TP-Link Archer C1200
If you are facing internet disconnection, and router performance issues with your tp-link router than you can use a factory reset option to roll back configuration and refresh router firmware.
If you forget the login username password or you are not sure the LAN IP address for your old router then you can go with the factory reset option to recover router access.
Steps to Reset the Router to default
- Locate a small reset button beside Ethernet port on the router.
- Press and hold the reset button for 10-15 seconds and release button when router led blinking and rebooting.
- Wait until the router finishes rebooting and boot again.
- Now access again default login settings as printed to router user guide or sticker.
Apart from basic settings after Login TP-Link Archer C1200 you can setup DMZ configuration, Port forwarding, and use the USB port to share a printer to network and many security features that help you to manage your network and also provide protection.
Download Latest Firmware
Related Post
- The Best Way to Boost Your Wi-Fi Speed Up to 10x [Tricks]
- 192.168.1.1 Login Spectrum Sagemcom Wave2 Router
- How to block User in TP-Link WiFi Router
- How to Design Captive Portal Login Page on TP-Link Load Balance Router
