How to Add VLAN on MikroTik to use Multiple DHCP Network
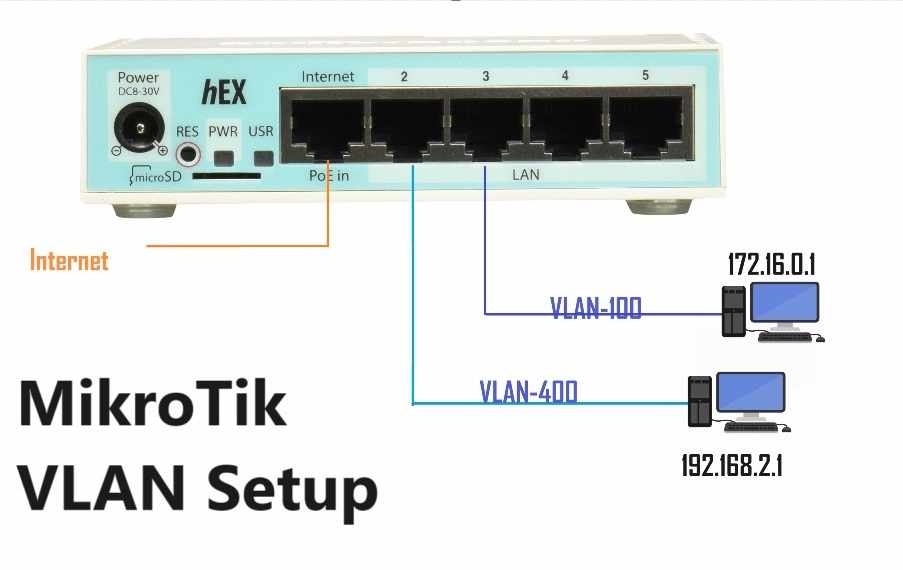
VLAN configuration is used to make a virtual interface using the single physical interface to make a separate network. VLAN is a secure way to virtually create two different networks using the same Switch for each different department. MikroTik VLAN Setup on Miktorik RouterOS is simple and easy and you can either define it on the bridge interface as well as on each LAN Ethernet.
You can create two different DHCP networks using a VLAN interface that defines different networks as per the VLAN ID as the Network for the Account is different than the Management Network so the Account Department can not access the Management PC/Mobile or another device.
You need a MikroTik router with the latest RouterOS firmware to start the configuration of VLAN. If you have a MikroTik CCR series, or Miktorik RB450 or MikroTik RB750Gr3 then you can just follow this guide to configure VLAN interfaces. VLAN configuration is the most used switch feature to make multiple different networks using the same physical Interface. Follow the simple VLAN tagged and untagged configuration manual for MikroTik RouterOS.
Steps to Configure VLAN on MikroTik Router Board
MikroTik VLAN setup using Winbox utility from a computer or Laptop to create multiple DHCP servers to make different networks for each department. Follow step by step below MikroTik VLAN tagging configuration steps to make it simple and easy.
- Internet Settings on Ethernet 1
- Add VLAN interface & VLAN ID and assign to Ethernet or Bridge
- Add IP address to VLAN Interface
- DHCP Server Setup on VLAN interface
- Test VLAN Setup
Now Get ready with a MikroTik Cloud core router or any other Router board with multiple Ethernet ports such as RB750, RB450, RB2011, RB3011 or any other that supports L4 software.
Login and WAN settings on Mikrotik RouterOS
The first step is to connect a working internet connection on the Mikrotik router before proceeding to setup the VLAN interface.
- Power ON Mikrotik RouterBoard using PoE power or using a DC adapter.
- Download the Winbox configuration utility and login to RouterOS.
- Remove the default configuration and go to “Bridge” and create a Bridge and add Ether2 to Ether4 to Bridge or if more than 4 LAN ports you can add all to Bridge.
- Go to IP address and add Internet IP address to Ether1 port. Also, Add Gateway and DNS settings to complete WAN configurations.
- Once internet settings are complete you can ping any site on Termnila to confirm if the internet working inside the router board.
Now follow the next steps to Add the VLAN interface and configure VLAN IDs.
ADD VLAN Interface and Configure VLAN IDs
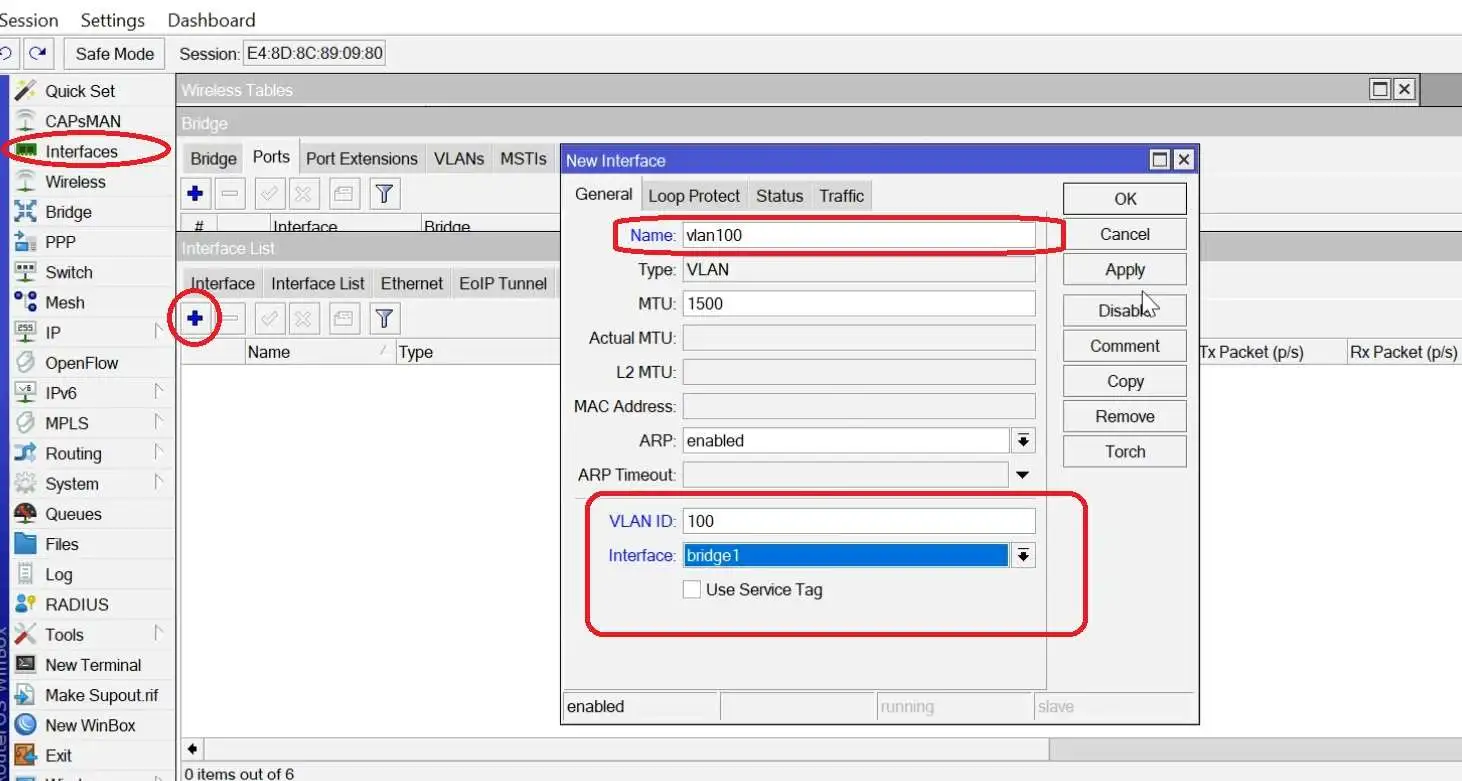
Go to Interface- VLAN tab
Press the Plug button (+) to Add a New VLAN interface.
Name- VLAN-100
VLAN ID- 100
VLAN interface– Ether2 (or Ether3 as well as you can also use Bridge Interface to assign VLAN)
Add VLAN 400 also and Asign to the same Ether2 or Bridge interface as follow the above steps.
Note: VLAN ID you can use as per VLAN ID already running on the network.
IP Address configuration on VLAN interface
After Adding the VLAN interface now assign the IP address to each VLAN interface to make the different network.
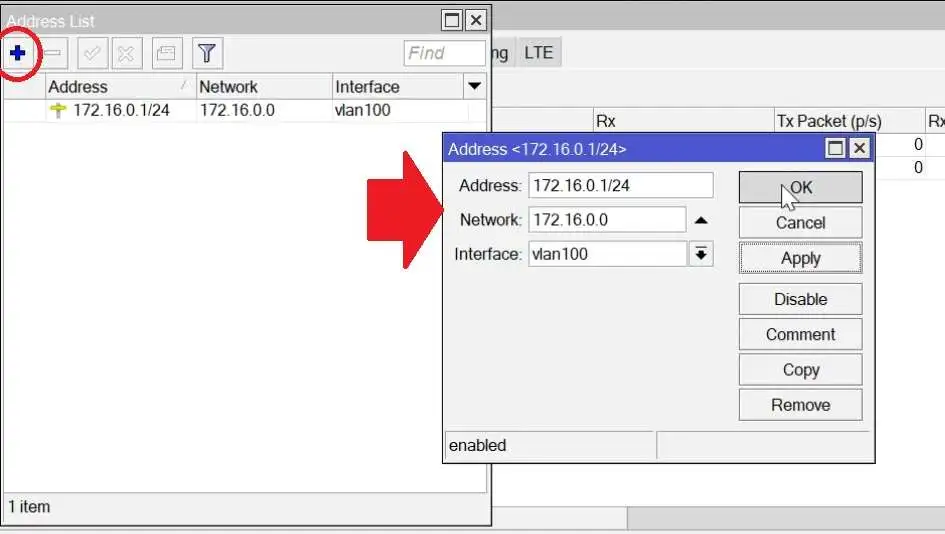
Go to the IP address from left left-side vertical menu.
Press the Plus (+) button to add the new IP address.
IP address- 172.16.0.1/24
Network-172.16.0.0
Interface- VLAN100
IP address for VLAN400
IP address – 192.168.2.1/24
Network- 192.168.2.0
Interface- VLAN400
After IP address configuration now next step is setup a DHCP server for Each VLAN ID.
DHCP server configuration for VLAN Interface
Now to make different Networks to each VLAn interface we need to configure the DHCP server on each VLAN interface.
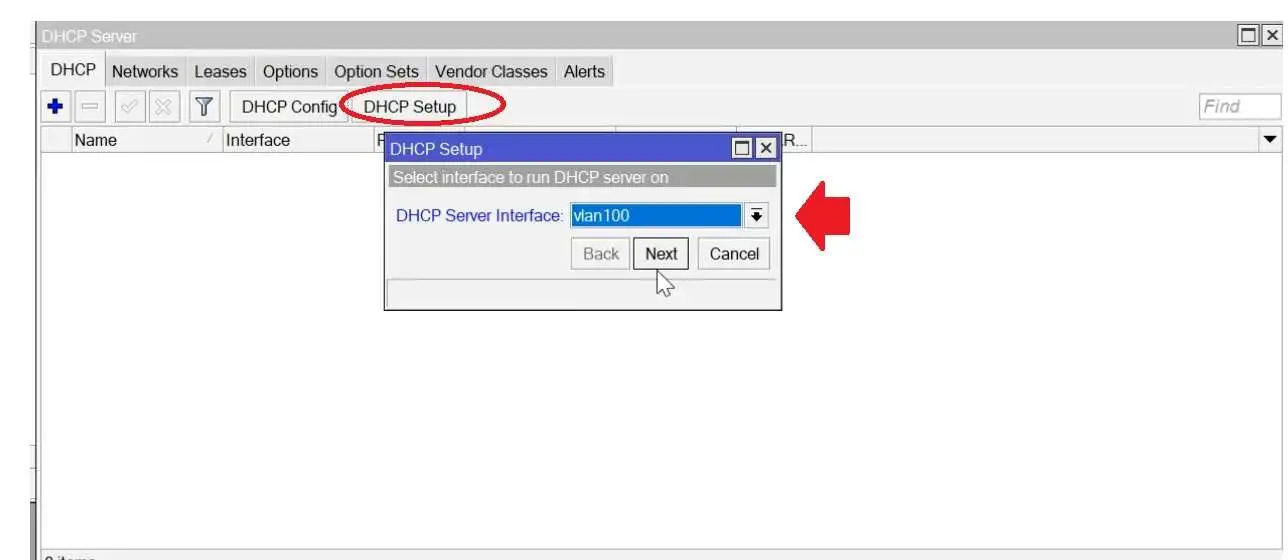
Go to IP- DHCP Server
Tap the DHCP SETUP button to start the DHCP server.
DHCP Setup for VLAN100
Select DHCP Seever Interface- VLAN100
IP Address- 172.16.0.1
DHCP IP range – 172.16.2.1 to 172.16.2.254 (you can limit the range if you want to use a minimum IP address)
In the next step, it shows the IP address range we assign to the IP address. Press next and finish the DHCP server setup.
DHCP Setup for VLAN400.
Select DHCP Server Interface- VLAN400
IP Address– 192.168.2.1
DHCP IP Range- 192.168.2.2 to 192.168.2.254
After finishing the DHCP server setup Now you can test the VLAN configuration.
Connect to the PC/or network switch assign the VLAN ID to the interface and check you will get an IP address as per the assigned VLAN ID and DHCP IP range.
VLAN Interface test
Connect Ethernet 2 to test VLAN 100 and VLAN 400.
If you use VLAN ID 100 to interface then your PC/Laptop or other Device will get an IP address from 172.16.0.1 and if you use VLAN ID 400 then the IP address will be 192.168.2.1 gateway,
Related Post
- Xfinity Router Troubleshooting: Common Issues and Solutions
- Top 5 Best Alternate Open Source Firmware for Your Routers
- Best VPN for multiple Devices 2024 [Free &Paid]
- Mikrotik Cloud Core Router (CCR) Setup and Configuration first time
