Login MikroTik LGH5 to Setup Point to Point
MikroTik LGH an outdoor dish antenna with inbuilt radio inside feeder used for long-range point to point and point to multipoint connectivity. There are multiple LGH devices that come under LGH series with different models such as LGH, LGH 5 AC, LGH Ac Lite, LHG XL 5AC with 5 GHz band, and LGH 2 support 2.4Ghz wireless band. MikroTik LGH wireless radio full specification and datasheet you can download from the official website to check reviews and features. This article will help you to Setup and Login MikroTik LGH 5 Wireless radio for Point to Point and Point to multipoint configurations. You can login to LGH 5 and any other MikroTik wireless router using multiple ways such as login with Winbox, Login using a web browser, and Login using Telnet command if you have good command in Mikrotik configurations using commands. You need to connect LGH 5 device using wired LAN connection to access settings using Winbox or web browsers.
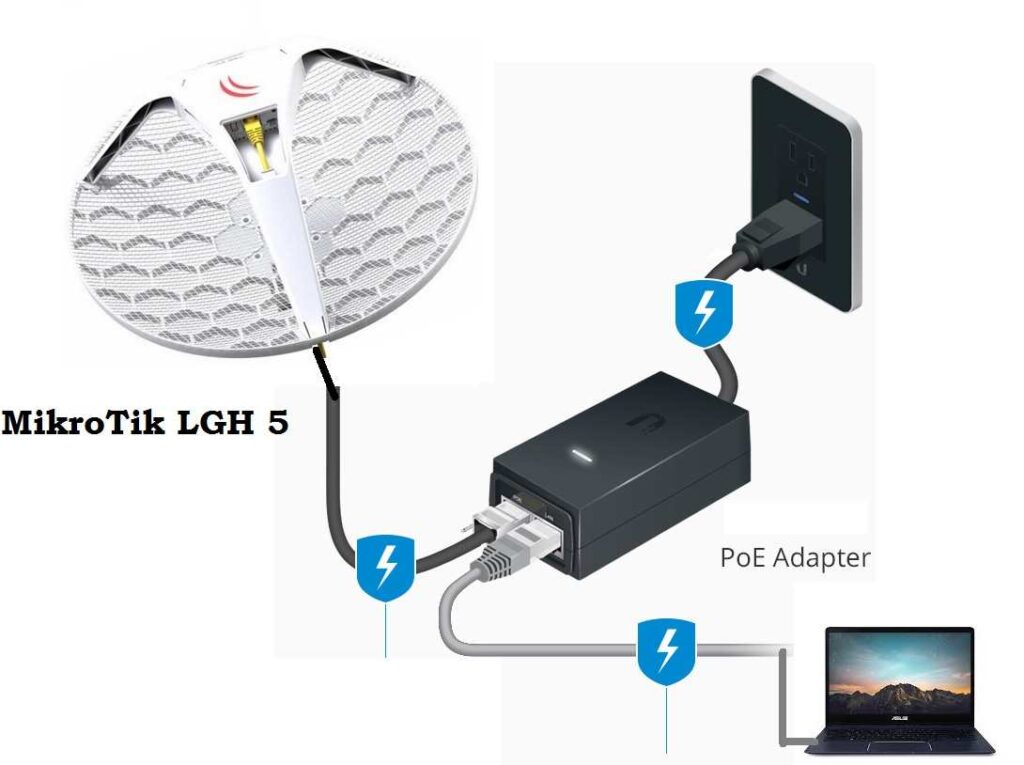
MikroTik LGH Physical connection
To configuration LGH in PTP or PTM wireless mode, the first steps are the proper connection with PoE adapter and LGH device. LGH Device routerboard inbuilt inside the dish feeder so you have to assemble complete LGH unit to physical connection with PC.
- Use straight LAN cable to connect LGH radio from PoE Ethernet port.
- Connect LAN cable to LGH routerboard Ethernet port and plug to PoE adapter PoE Out Port.
- Connect Lan cable from PoE Adapter LAN port to PC/Laptop LAN port for configurations.
Once physical connection completed with Mikrotik LGH device now you must know default login settings to access settings.
Mikrotik LGH 5Ac Default Login Settings
Although Miktorik configuration utility does not require and Default login IP address as it can login without IP address using Mac address in default mode for web browser login you required Login IP address.
Default Mirkotik LGH IP Address– 192.168.88.1
Login Username– admin
Default Password– Blank (no password)
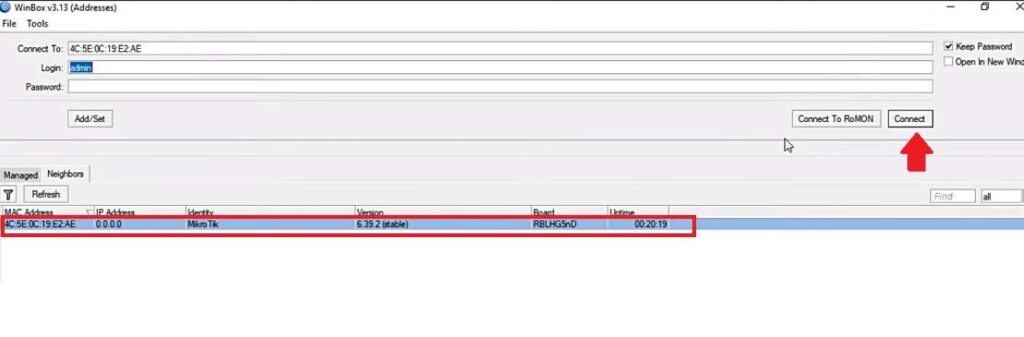
Login MikroTik LGH using Winbox
Winbox is an excellent configuration utility by Mikrotik supported all Mikrotik Power router and switches. LGH makes configuration easy and faster than a regular configuration method using a browser.
 .
.
If you log in before and already set a login password then use the same login password and press the connect button. Within a few seconds, you will enter to radio wireless configuration where you can configure your LGH device. The second way to log in using a browser.
Login LGH using Web browser
To access LGH settings from web browse you need to default login IP address and the computer should be in the same series IP address.
Go to Computer/Laptop TCP/IPv4 settings and use static IP address 192.168.88.2 before accessing LGH IP.
Open web browser and access http://192.168.88.1 to the URL bar and press the
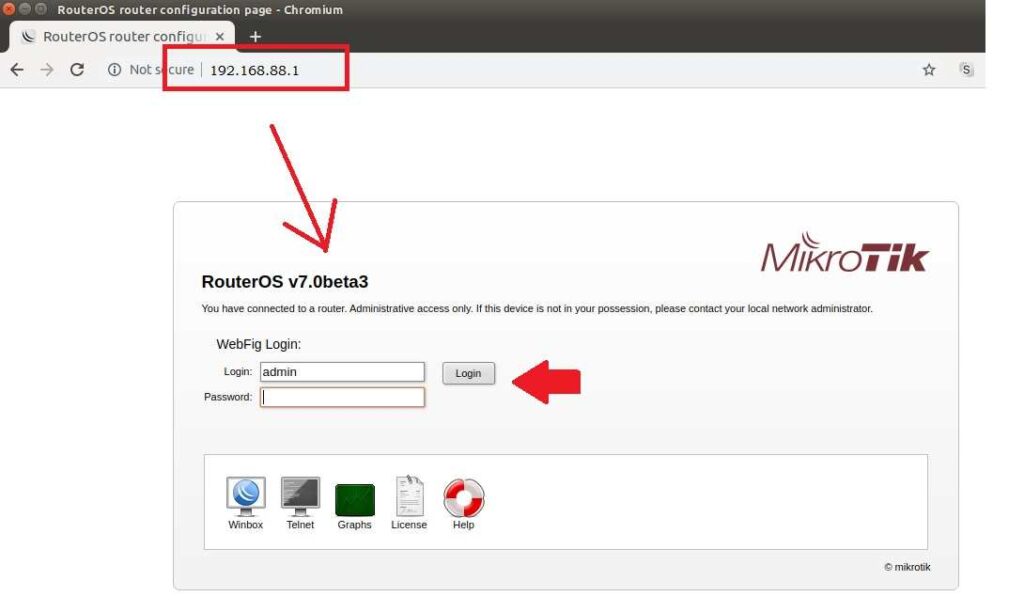 enter key.
You will get Mikrotik login page in default mode no password is required so press the login button to enter in settings.
Once you logged into settings the first step set a login password before configuring point to Point or any other mode.
Create a New User in MikroTik
You must create a new user with limited rights so you can protect your configuration from other users.
To create New users in Mirkotik follow the steps.
Go to System- Users from the Left side menu.
You will get “admin” as the default user created to the users list.
Press the Plus (+) button to create a new user.
User name- give a name for new user
Group– give access limits from Full or limited
Apply settings.
Change Password
You can change the password from System- Users or System Password.
Go to System- Users
Double-click user, you want to change the login password.
Go to the Password button from the user settings window.
OLD password– Blank in default mode
New Password– Create a new login password
Confirm password – Confirm new password
Save settings and log in with a new password. To configure in Point to point mode you must have two LGH 5 wireless devices to configure one in AP bridge mode and the second device in Bridge mode.
Related Post
- MikroTik 10 Best Device for Internet Service Providers
- How to install CCTV camera in Lift using Wireless Device
- 192.168.0.1/192.168.1.1 Tenda Login
- How to Set Internet Speed Limit per IP in Mikrotik from Winbox
